 Are you tired of hearing how "simple" it is to deploy apps with Docker Compose, because your experience is more one of frustration? Have you read countless blog posts and forum threads that promised to teach you how to deploy apps with Docker Compose, only for one or more essential steps to be missing, outdated, or broken?
To put this in context, I’ve been slowly learning Rust (on and off, if I’m honest) over the last couple of years. I started off enthusiastically, reading and experimenting any chance I had. Then, I'd stop as I found the ownership model quite foreign and challenging, or the syntax too alien from what I was used to in my regular development languages (mainly PHP, Go, and Bash). Then, some time later, I'd come back and pick up where I left off.
This went on for some time, resulting in mixed progress, until I made a commitment to myself, recently, to just keep going no matter how challenging I found it. To help out with staying consistent this time, I decided to start bringing together code from a number of the Rust tutorials that I've written for the Twilio blog into my first crate, making sure that it had solid documentation.
While I’ve been learning Rust, I’ve been very impressed with the quality of the documentation, no matter the package that I've used. It’s always been thorough, thoughtful — and most of all consistent, both in style and in presentation.
I wanted to live up to that standard with the documentation in my first crate.
One of the worst things you can do (in my opinion) is to share code that is hard — if not impossible — for others to get started with or learn anything about, because it doesn't have documentation.
So, the first question was:
How do you document Rust code?
So, I googled "rust documentation" (well, I think that’s what I searched for). Regardless, the first link of the search results was Rust Documentation which links to the Rustdoc book. This guide shows you what you need to know to get up and running with documenting Rust code.
To say that I was impressed by it would be an understatement! It shows all of the (inbuilt) commands that you need to use, how the Rust documentation system works, how to document your code, how to link to items, and so much more.
If you've not gone through the guide already, here's the short version.
You document your structs, functions, and anything else in your code using docblocks that start with either /// (outer) or //! (inner) code comments.
You use outer code comments pretty heavily when documenting Rust code.
Inner code comments are only for, as far as I know, providing top-level details of a module or crate.
Then, you run cargo doc to generate the documentation for your package.
If you want to view the generated documentation in your default browser, pass the --open argument to cargo doc.
That's all you need to get started. In 5 - 10 minutes you can be creating beautiful, thorough documentation, just like in any Rust package you've used, or the official documentation. If you've documented code before (we all have, right?! 🤭), then you'll be up and running in a few minutes, at most.
What makes documenting Rust code extra simple is that you don't need to install third-party tooling. Everything you need is available with the standard Rust installation.
Just to be clear, I have nothing against third-party tooling, such as MkDocs for example. It's just that, when you don't have to set something up, it's so much easier and quicker to get started, as there's so much less to do.
To me, inbuilt documentation tooling is a significant plus for learning Rust, one that will make the life of any developer who's new to Rust significantly easier. If you haven't considered documenting your Rust code, yet, I strongly encourage you to do so.
How do you document Rust code?
With that introduction out of the way, let's step through a few simple examples of how to document Rust code, taking some examples from my first crate, rustlio. I'm just going to show some of the essentials, not everything that you need to know. But, I'll provide plenty of links to further documentation, for when you want to go further.
In rustlio, you'll find the following struct which models the phone number data returned from requests to Twilio's Lookup v2 API.
#[derive(Debug, Default, Deserialize)]
pub struct PhoneNumber {
    pub country_code: Option<String>,
    pub phone_number: Option<String>,
    pub national_format: Option<String>,
    valid: bool,
    validation_errors: Option<Vec<String>>,
    pub sim_swap: Option<SimSwap>,
    pub line_type_intelligence: Option<LineTypeIntelligence>,
}
To document it, we'll need:
- A short summary of what the struct is for
- An, optional, longer description, one that goes into greater depth, with links to further information
What would also be good is an admonition, to draw attention to the fact that it's a work in progress and doesn't have properties for all of the phone number information returned by Twilio.
In the example below, you can see an example of documenting it.
/// This models the phone number information that is returned from requests to the API
///
/// <div class="warning">
/// Currently, the struct only models some of the properties.
/// The remaining properties will be added in future versions of the crate.
/// Specifically, it only models the core properties plus properties of the Sim Swap and
/// Line Type Intelligence add on packages.
/// </div>
///
/// You can find complete documentation about all of the available properties
/// [in the documentation](https://www.twilio.com/docs/lookup/v2-api#response-properties).
#[derive(Debug, Default, Deserialize)]
pub struct PhoneNumber {
    pub country_code: Option<String>,
    pub phone_number: Option<String>,
    pub national_format: Option<String>,
    valid: bool,
    validation_errors: Option<Vec<String>>,
    pub sim_swap: Option<SimSwap>,
    pub line_type_intelligence: Option<LineTypeIntelligence>,
}
The struct now has a docblock with:
- A short summary, stating what the struct is for
- A warning admonition to draw attention to the fact that the implementation is, currently, incomplete
- A Link to further information.
Note that the contents of the docblock are implicitly formatted as Markdown. If you're not familiar with the format, check out Markdown Guide! It's my go-to guide whenever I have a question about Markdown.
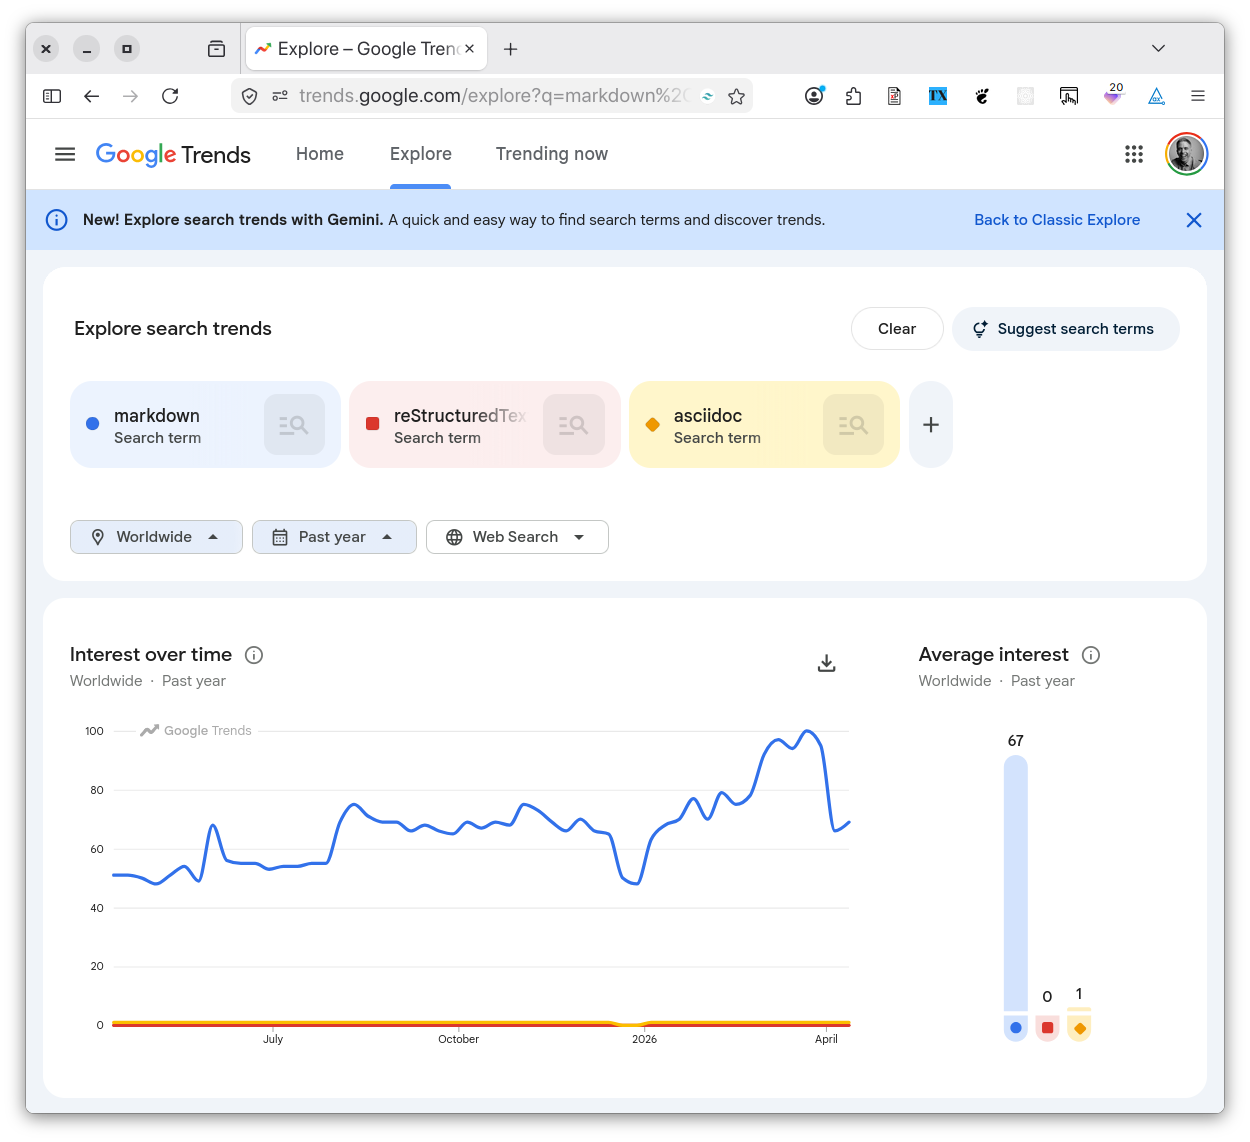
I'm not a huge Markdown fan (I much prefer AsciiDoc if I get the chance). However, I respect that Markdown is virtually ubiquitous for writing developer documentation — except in the Python community. Over there, as far as I know, they use reStructuredText and Sphinx.
Anyway, while it's not the definitive statement on the topic, Google Trends sure shows that Markdown's far and away the most searched for markup language in the last five years.
With the simple example created, it's time to build and review the documentation. To do that, run the following command, which builds your package's documentation and opens it in your default browser.
cargo doc --open
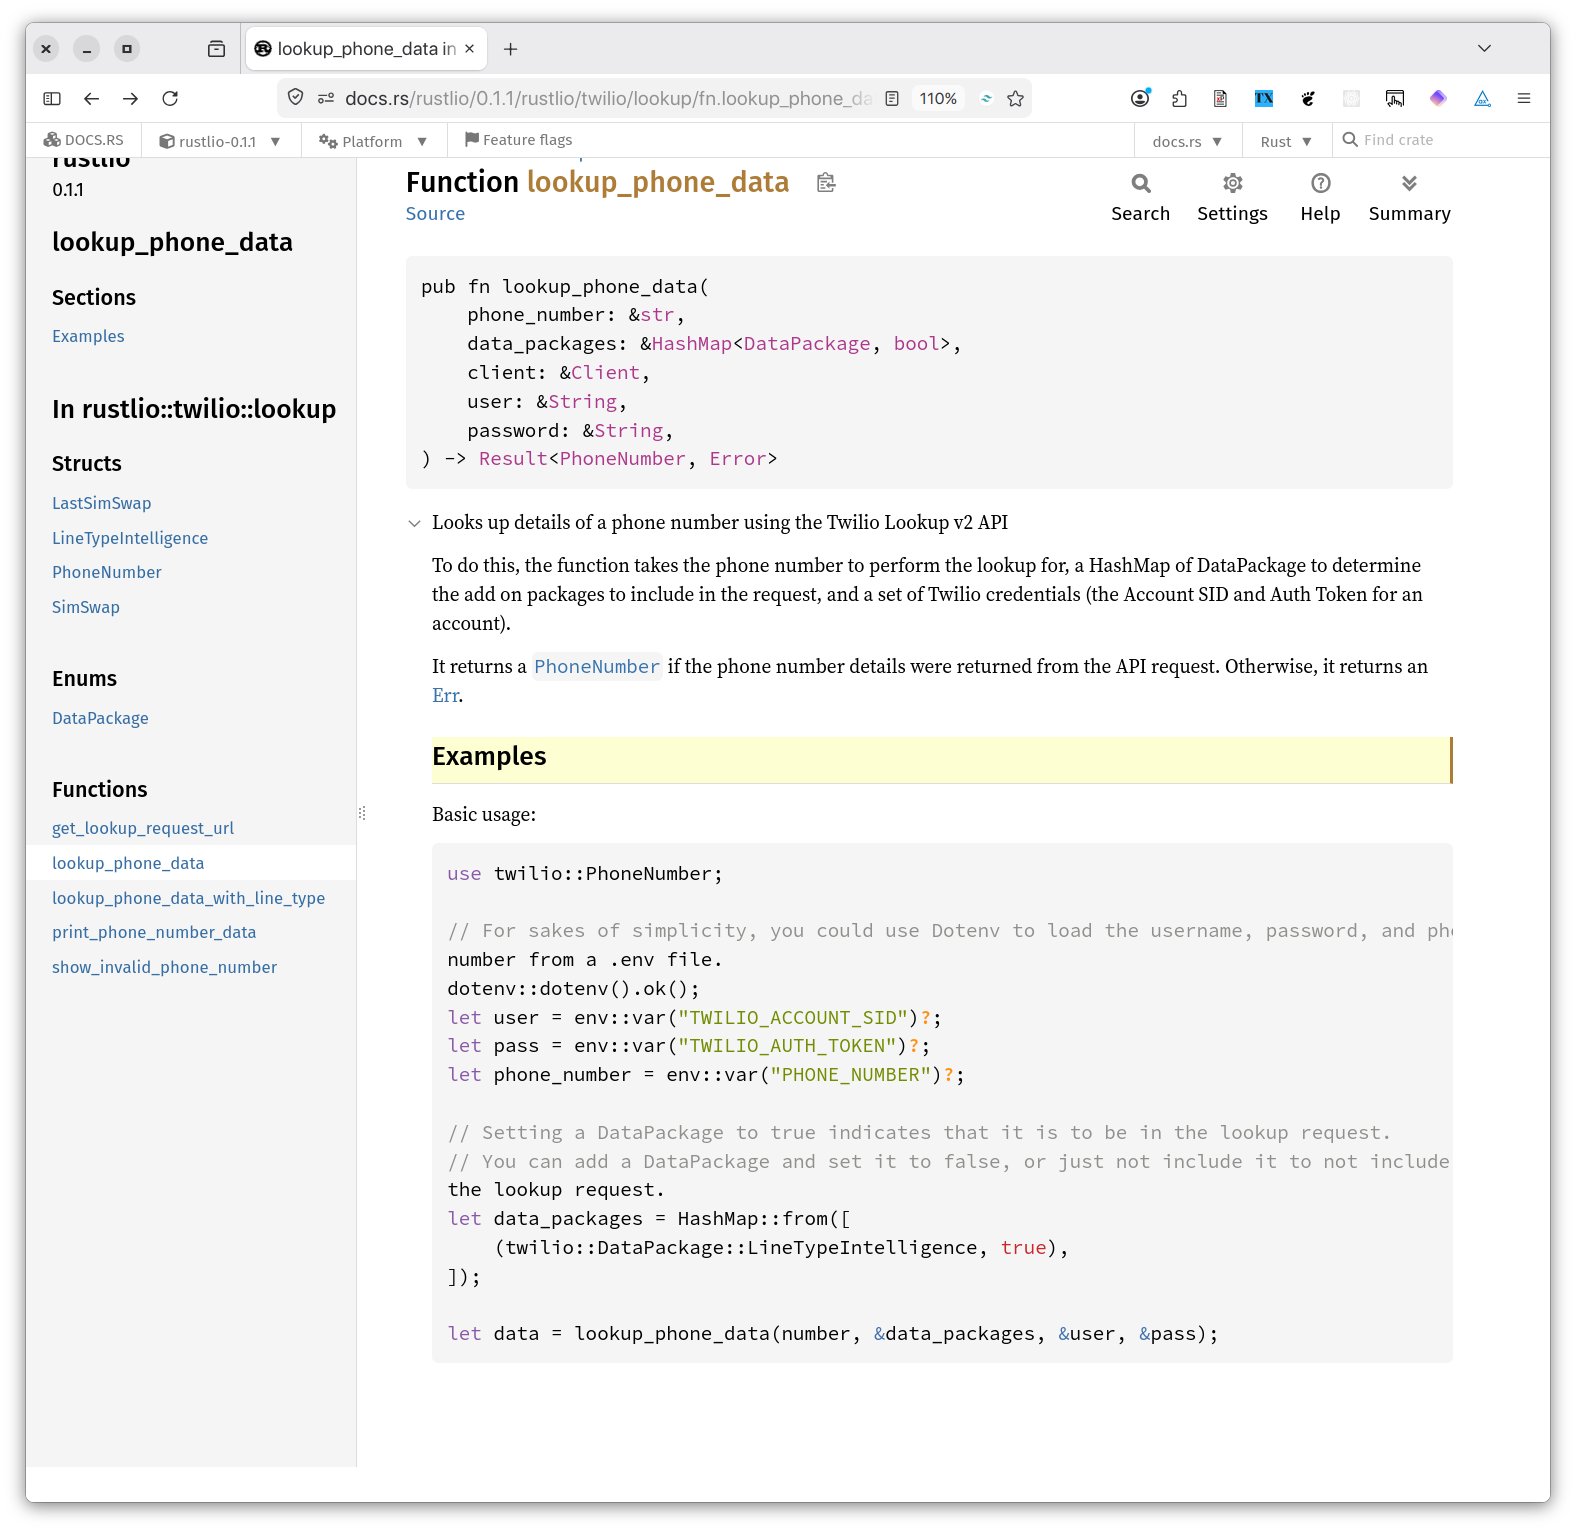
When your default browser opens, you'll see your package's documentation, formatted just like any other package on docs.rs, as you can see in the screenshot below.
You are now a Rust documentarian. I don't know if that's an official term, but it works for me.
Usage examples and linking
Now, let's see how to write more sophisticated documentation by adding some usage examples, and linking to other parts of your package as well as other Rust packages.
The struct that we just documented doesn't include any. To be fair, though, it didn't make sense to include any. So, let's have a look at a function from the same library, which you can see below.
pub fn lookup_phone_data(
    phone_number: &str,
    data_packages: &HashMap<DataPackage,bool>,
    client: &Client,
    user: &String,
    password: &String,
) -> Result<PhoneNumber, reqwest::Error> {
    let request_url: String = get_lookup_request_url(
        format!("https://lookups.twilio.com/v2/PhoneNumbers/{phone_number}"),
        data_packages
    ).to_string();

    let response = client
        .get(request_url)
        .basic_auth(user, Some(password))
        .send()?;

    let result = response.error_for_status();
    return match result {
        Ok(data) => {
            let record: PhoneNumber = data.json()?;
            return Ok(record);
        },
        Err(e) => Err(e),
    }
}
In the code block above, you can see the lookup_phone_data function. Without diving too deep into its workings, it retrieves details of a phone number using the Twilio Lookup v2 API with a blocking Reqwest Client object. To do this, the function requires the phone number to retrieve, an HTTP client for making API requests (it's early days for the library), and a set of Twilio credentials to make authenticated requests to the API.
Note that it uses the PhoneNumber struct, introduced earlier, and returns an Error.
These provide excellent opportunities to show documentation linking.
In the code block below, you can see how I've documented it.
/// Looks up details of a phone number using the Twilio Lookup v2 API
///
/// To do this, the function takes the phone number to perform the lookup for, a HashMap of
/// DataPackage to determine the add on packages to include in the request, and a set of Twilio
/// credentials (the Account SID and Auth Token for an account).
///
/// It returns a [`PhoneNumber`] if the phone number details were returned from the API request.
/// Otherwise, it returns an [Err](https://doc.rust-lang.org/std/result/enum.Result.html#variant.Err).
///
/// # Examples
///
/// Basic usage:
///
/// ```
/// use twilio::PhoneNumber;
///
/// // For sakes of simplicity, you could use Dotenv to load the username, password, and phone
/// number from a .env file.
/// dotenv::dotenv().ok();
/// let user = env::var("TWILIO_ACCOUNT_SID")?;
/// let pass = env::var("TWILIO_AUTH_TOKEN")?;
/// let phone_number = env::var("PHONE_NUMBER")?;
///
/// // Setting a DataPackage to true indicates that it is to be in the lookup request.
/// // You can add a DataPackage and set it to false, or just not include it to not include it in
/// the lookup request.
/// let data_packages = HashMap::from([
///     (twilio::DataPackage::LineTypeIntelligence, true),
/// ]);
///
/// let data = lookup_phone_data(number, &data_packages, &user, &pass);
/// ```
pub fn lookup_phone_data(
    phone_number: &str,
    data_packages: &HashMap<DataPackage,bool>,
    client: &Client,
    user: &String,
    password: &String,
) -> Result<PhoneNumber, reqwest::Error> {
    let request_url: String = get_lookup_request_url(
        format!("https://lookups.twilio.com/v2/PhoneNumbers/{phone_number}"),
        data_packages
    ).to_string();

    let response = client
        .get(request_url)
        .basic_auth(user, Some(password))
        .send()?;

    let result = response.error_for_status();
    return match result {
        Ok(data) => {
            let record: PhoneNumber = data.json()?;
            return Ok(record);
        },
        Err(e) => Err(e),
    }
}
I've added a short description as before, as well as a longer description as I felt that code required it.
Intra-doc Linking
Note the following lines as the end of the longer description:
/// It returns a [`PhoneNumber`] if the phone number details were returned from the API request.
/// Otherwise, it returns an [Err](https://doc.rust-lang.org/std/result/enum.Result.html#variant.Err).
These lines show how to:
- Link to an element by name within the current package (otherwise referred to as an 'intra-doc link')
- Link to an element of another Rust package
If you're familiar with Markdown, the latter is just a standard Markdown link. Intra-doc linking is new, though. By enclosing the name of an element (a function, struct, etc) within square brackets, a link to that element within the current package will be generated. Linking to PhoneNumber was simple as the module is all in the same file in the crate. However, if you have a more sophisticated file layout in your crate, you might need to make use of more sophisticated links.
While I've not experimented with it yet, the documentation has this to say:
You can refer to anything in scope, and use paths, including Self, self, super, and crate. Associated items (functions, types, and constants) are supported, but not for blanket trait implementations. Rustdoc also supports linking to all primitives listed in the standard library documentation.
You can also refer to items with generic parameters like
Vec<T>. The link will resolve as if you had writtenVec<T>. Fully-qualified syntax (for example,<Vec as IntoIterator>::into_iter()) is not yet supported, however.
I've only scratched the surface of what's on offer, so take a good look through the documentation to find out all that it has to offer.
Usage Examples
Then, comes the usage examples. I introduced them, as you can see below, because that's what I've seen consistently in the Rust code that I've looked through:
/// # Examples
///
/// Basic usage:
It doesn't seem to be an official part of the Rust Style Guide, rather the de facto approach. Regardless, it's simple, clear, and concise, and the approach that I'll be following until someone recommends otherwise. It's also a good opportunity to highlight how some even simple Markdown will help you when your documentation is generated.
"Examples" is formatted as an h1 header (which will be converted to an h2 in the generated documentation). The code example is wrapped in triple backticks, which is how you create a standalone code block in Markdown. Because of that, these elements will be appropriately formatted when generated by the documentation. You can see an example in the screenshot below.

Experiment with writing more sophisticated documentation to see what it looks like.
How to deploy your documentation
You don't have to create any deployment scripts, set up a custom server, an AWS bucket, or anything else to publish your documentation. You don't have to learn a static site generator, such as Jekyll or Hugo. You don't have to learn about GitHub Pages.
To publish your Rust documentation, you just publish your crate to Crates.io.
This is another equally beautiful part of documenting Rust code. As part of publishing a crate, the crate's documentation is published to docs.rs for you, the official home of Rust code documentation.
The process uses a standard structure, which provides your documentation with a standard style, formatting, and layout. The publishing process will extract all of the elements of your library and render them in a standardised layout, using a standardised style guide and formatting.
In the screenshot above, you can see that the page is composed of two parts:
- Navigation on the left
- Content on the right
The navigation works from the top-level of the package, starting with its name and current version, and then lists all of the available structs, functions, and so on. All of the elements are clickable, allowing you to quickly dive deeper into relevant parts of the package. Naturally, depending on the complexity of your package, this content will vary.
On the right, you can see breadcrumb navigation, allowing you to move through the package's structure, a link to the current element's source, a function definition, description, and usage examples, along with a standard toolbar, including search and settings buttons.
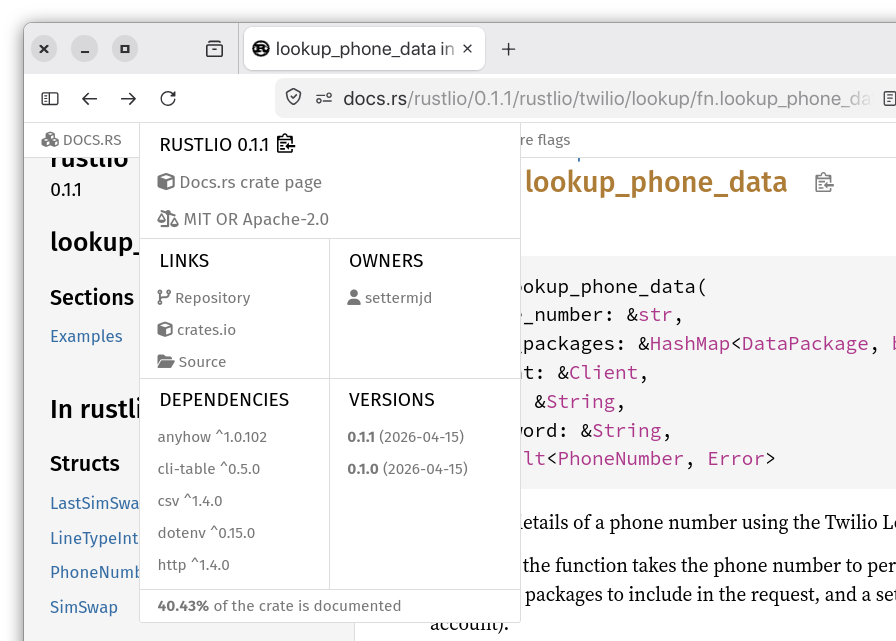
If you click the package's name or Platform links in the top-level navigation, you'll find another great feature of the Rust documentation. These show a wealth of further information about the package, such as the package's metadata, extracted from Cargo.toml, the package's dependencies, how much of it has been documented (something that I've not seen before), and the platform that it's built for.
It's something that just keeps on giving.
That's the essentials of documenting your Rust code
While I've only shown the essentials of how to do so, I hope that you see just how simple documenting your Rust code can be, how little you have to do to get started, and how much you'll likely be drawing on your existing knowledge and experience. If you've not started documenting your code yet, I strongly encourage you to get started. It's been a proverbial breath of fresh air for me. I hope that it will be the same for you.