 Are you tired of hearing how "simple" it is to deploy apps with Docker Compose, because your experience is more one of frustration? Have you read countless blog posts and forum threads that promised to teach you how to deploy apps with Docker Compose, only for one or more essential steps to be missing, outdated, or broken?
"A TUI?", you ask. Yes. A TUI.
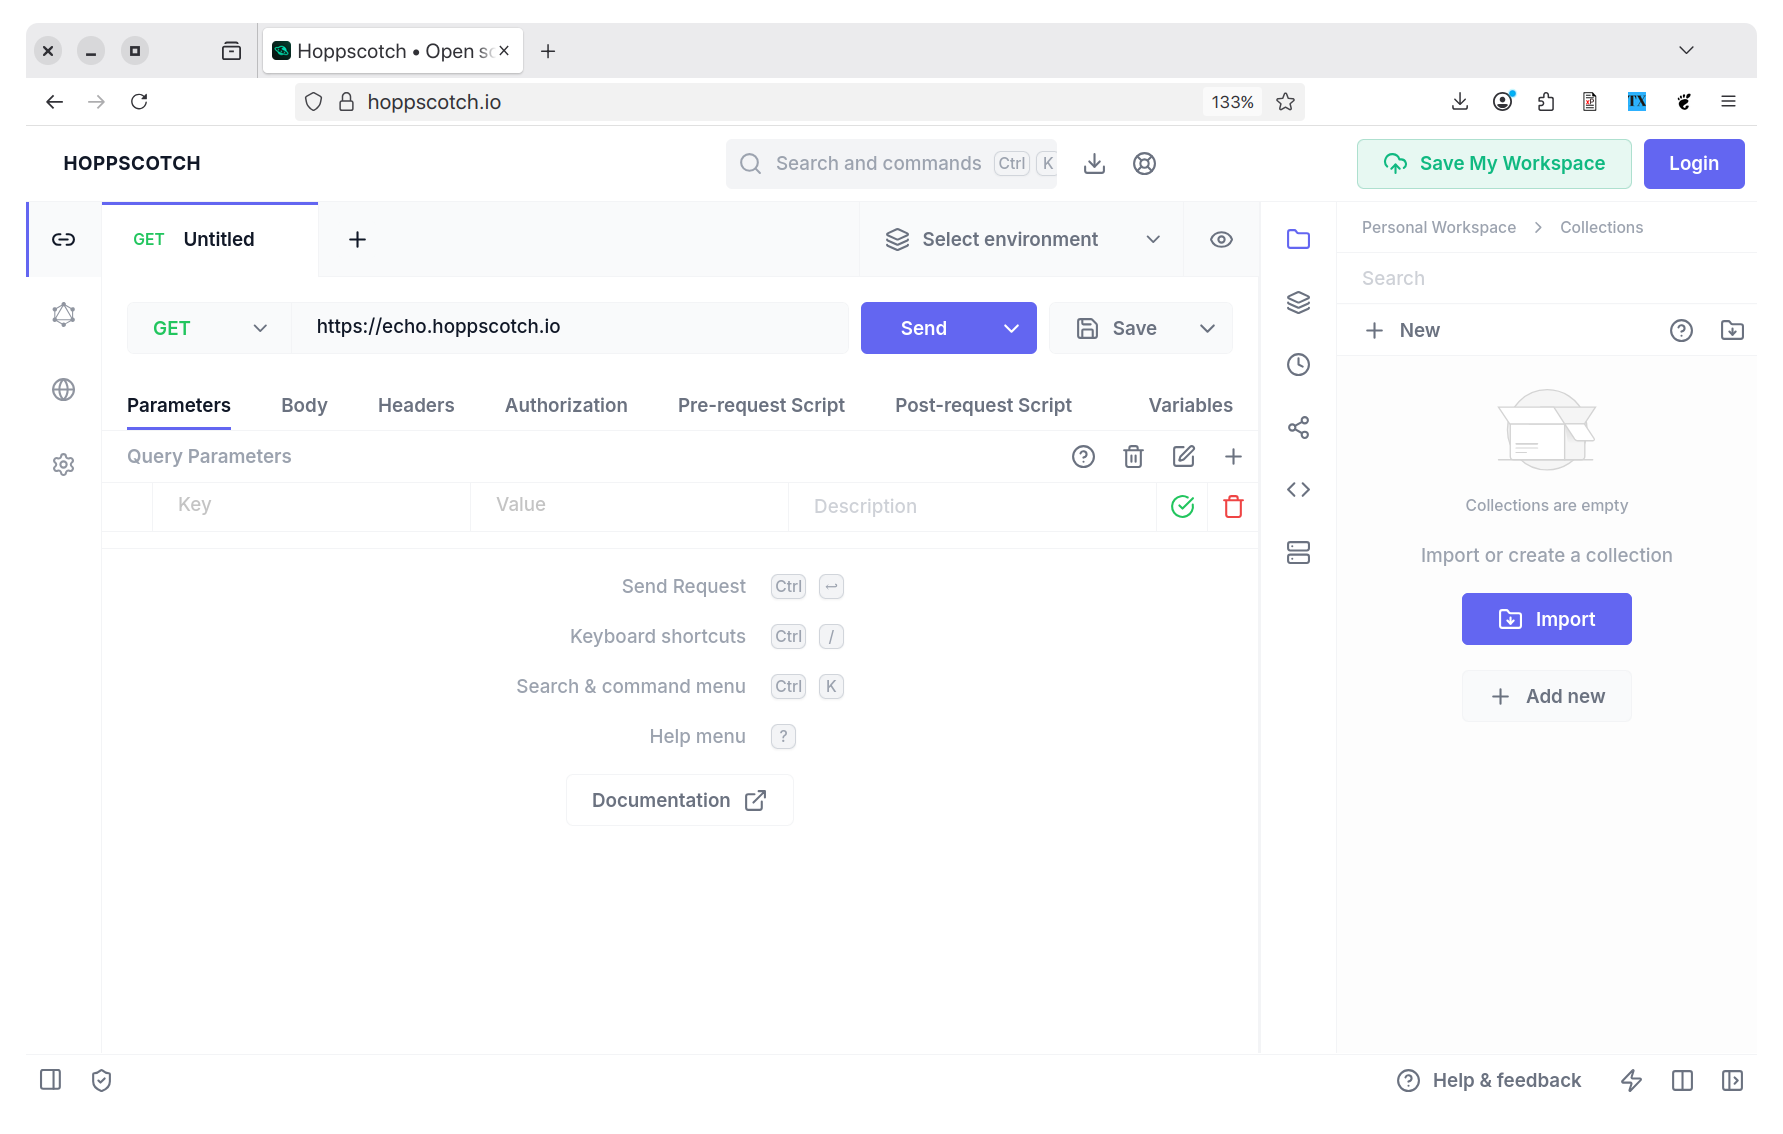
Why would you use one, when you could use a GUI such as Postman or Hoppscotch? Why would you use one instead of the venerable curl, which can do everything you need (and likely so much more)?
Both are really good questions. I’m guessing that if you’re a GUI user, or are a long-time user of any given app or tool, whether the three listed above or any other, you might not be interested in yet another one.
However, if we’re anything alike, you just might be! Now, you may have some preconceived ideas about TUIs, such as them looking rough – perhaps even awful – or being hard to use.
Sure, that might well have been the case for a really long time. But, in recent years, there’s been a bit of a renaissance in the world of TUIs. They’re not your father (or grandfather’s TUIs).
Oh no. Modern, well-built TUIs, such as resterm, are, as you’ll see, amazing! They’re easy to use, polished, make good use of space and colour, and use far few system resources than a GUI. What’re more, if you’re a keyboard warrior, or at least prefer to keep your hands close to the keyboard most of the time, then TUIs are a dream, as you can do everything without a mouse or a trackpad!
Before we dive in to resterm (which you can see above), here are two more solid benefits of TUIs over GUIs:
- GUIs don't always run on all the major operating systems. For example, Sourcetree is only available for macOS, and Tower is only available for macOS and Windows, but not Linux).
- Can you automate curl with shell scripts? It might not be something you're interested in, or ready for.
So, for all of these reasons, and so many more, if you're looking for an app that's cross-platform, open source, and requires no shell scripting whatsoever, resterm is for you!
For complete transparency, I'm not getting paid to plug it.
I came across it earlier today, thanks to the venerable OSnews (an awesome website for keeping track of the state of computing across the globe).
I was intrigued to hear about another terminal UI app, as I've been using them more lately, and was curious if one could compete with Postman or Hoppscotch (which you can see below), or break my love of curl — even just a bit.
I was not ready for what I was about to discover!
While I'm only still getting familiar with it, I’ve already found it to be a truly wonderful app. Mainly as it has an extremely well thought out UI.
Before you start using it, however, you need to familiarise yourself with .http and .rest files, as they’re what it uses to know what requests to make.
I don’t know that much about them as yet. But, I found this on them from Tim Deschryver:
.http files are a simple way to quickly invoke your API endpoints because you don't have to leave your IDE to use a separate tool. I use it regularly when I'm building a new feature. You can commit this file to your repository so that your teammates can also make use of it! HTTP files are supported by most IDEs (for Visual Studio Code, you'll have to install the REST Client extensions), the only caveat is that the variables syntax is (currently) different between Visual Studio products and JetBrains products.
And, I found this on the Visual Studio 2022 blog:
The .http file format and editor was inspired by the Visual Studio Code REST Client extension. > The Visual Studio 2022 .http editor recognizes .rest as an alternative file extension for the same file format.
If you’re looking for a definitive resource for .http files, definitely go through either the Visual Studio 2022 blog article, or the Visual Studio REST Client extension. Both provide excellent details on the complete range of supported functionality.
In short, .http and .rest files store the instructions for making one or more HTTP requests in a simple text-based format The format is rather similar - though not quite the same as - an HTTP request, as defined in rfc2616.
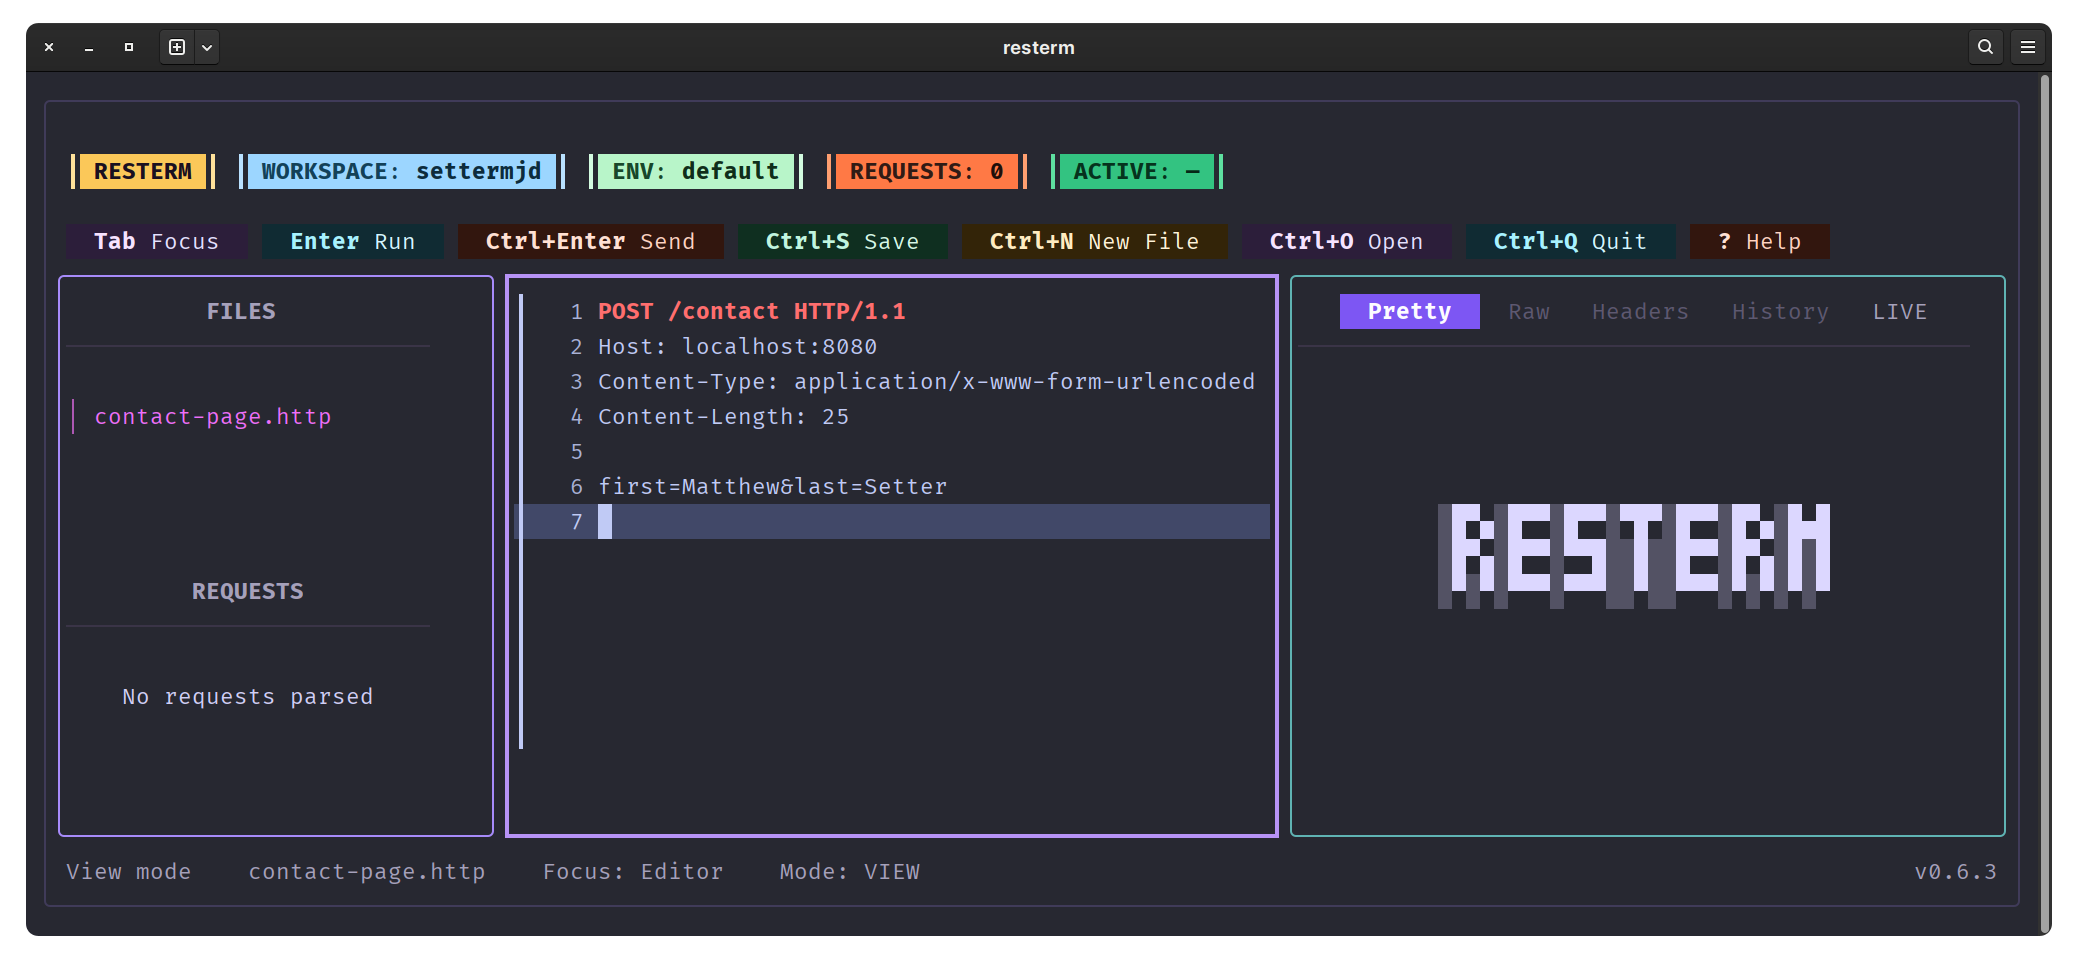
Let’s say that you have built a small web-based application that has an endpoint for processing a contact form, and that you want to test that it works. The app (built in your programming language of choice) is running on your local development machine, is listening on port 8080, and has defined the "/contact" path for accepting contact form requests.
How would you create a request to test it? Well, for a simplistic example, take a look at the example below:
POST http://localhost:8080/contact
Content-Type: application/x-www-form-urlencoded
Content-Length: 25

first=Matthew&last=Setter
This request will make a POST request to "http://localhost:8080/contact" where I have a small Mezzio app running. When sent, the request will send the Content-Type and Content-Length headers, required for sending a POST request, along with form data. The form data contains two fields, first and last (a generic user’s first and last names), along with values for both fields.
If you’re not familiar with hand-crafting HTTP requests, check out the MDN documentation, which is excellent. There you can find out everything you need to know with numerous examples. However, bear in mind that .http files don’t store HTTP requests exactly as per the spec, but rather a slightly different version. You can find a wealth of information in the Visual Studio 2022 documentation.
Anyway, a .http file can contain instructions for one or numerous requests and is what Resterm uses to specify the requests that it will make.
For what it’s worth, I’m focusing my attention in this tutorial around HTTP requests, as they’re the ones that I’m most familiar with. If you’re more familiar with GraphQL and gRPC, feel free to experiment with them instead. I’ll likely update this article when that time comes for me.
How do you use Resterm?
Anyway, with that in mind, let’s step through how it works. You can start it:
- With or without a .http or .rest file
- With one or more .http or .rest files in directory where you start Resterm from, or somewhere else on the local filesystem
Alternatively, you can create .http and .rest files from scratch in Resterm’s editor.
In the screenshot above, I’ve started Resterm without referencing a .http file, but have created one (which is yet to be saved) named contact-page.http. Then, I’ve tabbed to the Editor in the middle column, and written the request above.
Regardless of whether you do the same thing, or edit an existing .http file, it can be saved by pressing either Ctrl+S or Ctrl+N. If you create a new file, Resterm will prompt for a file name and store it in the directory where Resterm was started.
The editor is referred to as a "vim-light" experience. So, if you’re not familiar with Vim (or, even better, neovim), then you might find the editor a little confusing at first.
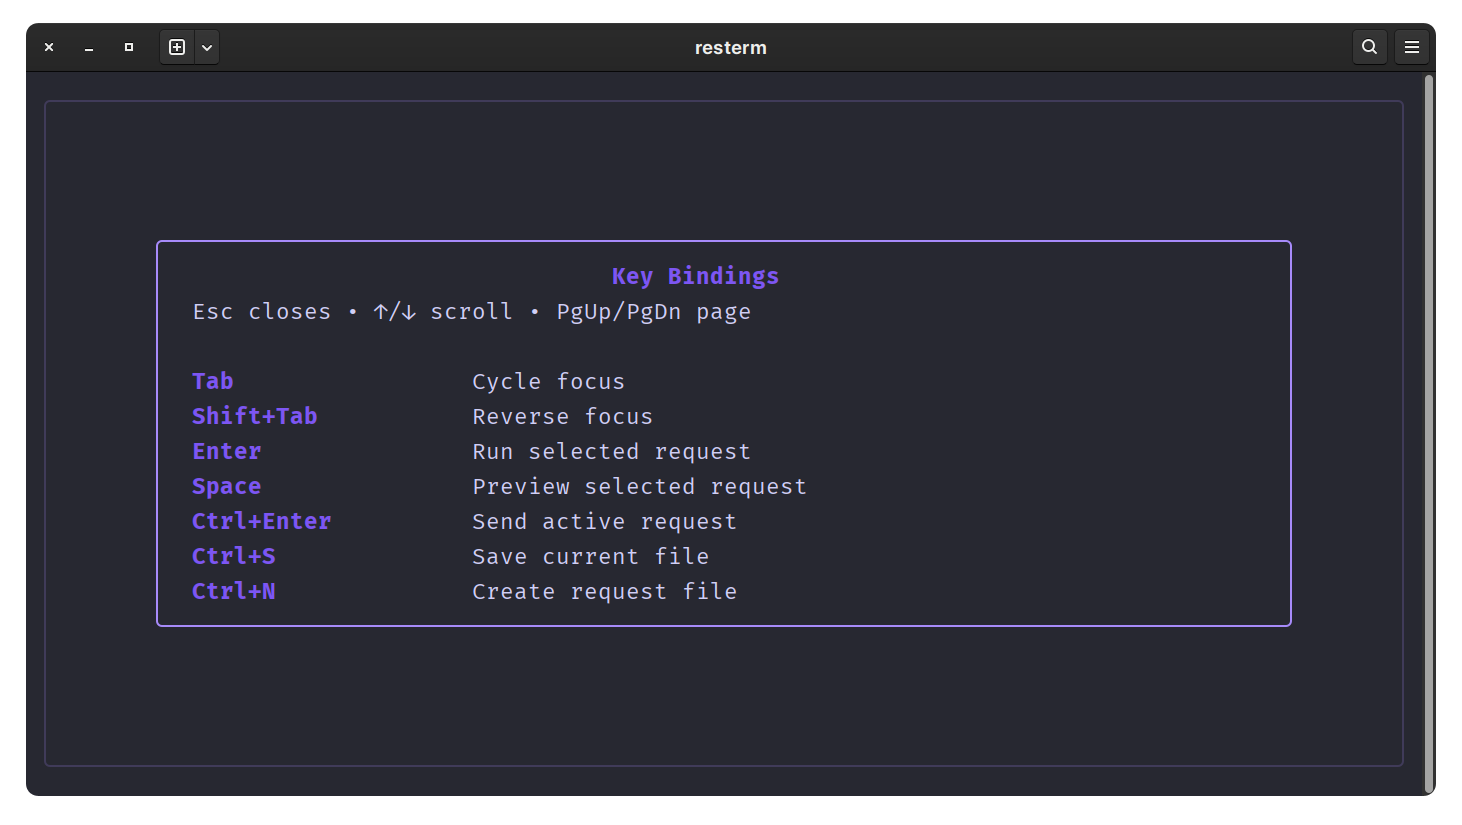
However, if you’re familiar with other command-line editors, such as Pico, Ed, or Emacs, then you’ll likely pick it up quite quickly. That said, there isn’t much functionality that you need to learn. And, you can find all of the key bindings by pressing ? and scrolling or paging down to the "Editor motions" section.
Anyway, with the request ready to run, if you press Enter, Return, or Ctrl+Enter, the request will be sent. Then, whether the request was successful or not, you’ll see details of the response in the third panel on the right-hand side.

Similar in appearance to Postman and Hoppscotch, it presents the response details in three views:
- A pretty printed or nicely formatted view. The example in this article doesn’t do this functionality justice, as the response’s body is so small. But, if a response had a large JSON body, for example, formatting it and apply syntax highlighting would definitely make it easier to parse and review.
- A raw details view. This is the response, both the headers and the body, as it was sent back from the server with no formatting whatsoever.
- Just the response’s headers view. This view is great if all you’re interested in are the headers, such as the response status, if a header was sent, or the size of the response, etc.
There are times for using each of these, and times when the others make more sense. I love how the app reuses existing approaches, whether intentionally or not. That consistency makes it easier to learn how the application works.
The final aspect that I’ll cover in this, initial, article is that Resterm keeps track of all of the requests that you run in each session. You can find this information in the History tab, next to Headers. While experimenting with the app, I found it really handy to have this functionality available.
What’s more, it’s beautifully laid out. The view displays previous requests in a simple, paginated view, with a maximum of four requests displayed per page. It makes excellent use of space, and pagination is extremely intuitive, thanks to it reusing common navigation conventions.
- The up and down arrow keys to move between records
- The down arrow on the last record of one page takes you to the first record on the next page
- The up arrow on the first record of one page takes you to the last record on the previous page
- Page Down takes you to the next page of results
- Page Up takes you to the previous page of results
- Home takes you to the first page of results
- End takes you to the last page of results
That’s a rapid introduction to resterm
I could go on and on and on about it, but I think you get just how enthusiastic I am about the app. It’s a nice change from hand-crafting curl commands in the terminal (even with the benefit of Ctrl + X, Ctrl + E). But, far more so, I just can’t get over how wonderfully, how thoughtfully, how intuitively it’s designed. It does so much, yet so simply and so well. The key bindings are intuitive, and the UI colour theme makes sense.
If you’re looking for a simple, universally available app to test your web apps and APIs, and you’re up for using a terminal app, then give resterm a go. It’ll take a few minutes to get used to it. But, after that, you won’t look back.
To be fair, there’s more to it than I’ve covered here, functionality that I’ll get to in future articles. However, I just wanted to get you started. Let’s see where this goes together.