The reason that I’m writing this post is because of a question on an earlier post about intercepting requests and modifying responses with Burp Suite. The person wrote:
Your article is very good. I need your help regarding changing whole content in response body in burp there is "match and replace" tab in burp proxy options. Inside it is function called "response body". So how to configure that? Let's take an example. the site is http--time,akamai,com and it shows current time. So how to configure that "response body" option to show fake time (eg. 00000000) when i request that akamai url. And also how to make it happen "response body" replace should work only on akamai site, not all other site.
Reading it, I thought it through and realised that I’ve not yet learned that aspect of Burp Suite, so I wasn’t sure how to answer them. However, that’s as good a reason as any to learn; right?
And after a little bit of digging and experimentation, I found out how. After doing so, it seemed to make more sense to write up a blog post covering how that particular bit of functionality works than answering directly in the comments. There’s more opportunity to dive deeper and to add supporting images and other content than you can with a Disqus comment.
What are Match and Replace Rules?
Match and Replace, as the name implies, provide the ability to find (or match) and replace certain parts of requests and responses, as they pass through Burp Suite’s proxy. Currently, you can match and replace the following:
- Request: body, header, param name, param value, and first line
- Response: body and header
At first glance, that might not seem too compelling. However, the match can be performed using static strings, or regular expressions. As a result, depending on your regular expression prowess, you can make some pretty fancy changes.
{{< partial "inline-book-promotion" >}}
Why Would You Want to Match and Replace Requests and Responses?
There are all kinds of reasons why you might want to replace certain parts of a request or a response. The main one, however, is seeing how the application responds when input changes unexpectedly. For example:
- Does an integrating client respond as expected when an HTTP 200 response code is returned, but there’s no response body?
- Does an integrating client handle a malformed response payload?
- Does your app handle a malformed request?
- Does your app correctly sanitise request parameters?
There are loads more things that you can think of, I'm sure. However, these make for a good start.
What Should We Match and Replace with Burp Suite?
Let’s assume a fictional scene. Say you want to do something trivial, like replacing (or removing) the X-Powered-By header. Why? Well, this is a trivial introductory example, so you don’t need a big "why".
However, one is to automatically change the X-Powered-By header to something like X-Powered-By: MyWeb, JSP/2.2.
That way, you could simulate a different web technology.
Alternatively, you could change the HTTP response code, to see how an API client might interact.
I’ll leave the brainstorming up to you.
So, let’s push ahead and change the X-Powered-By header.
Click the "Proxy" tab, then click the "Options" tab.
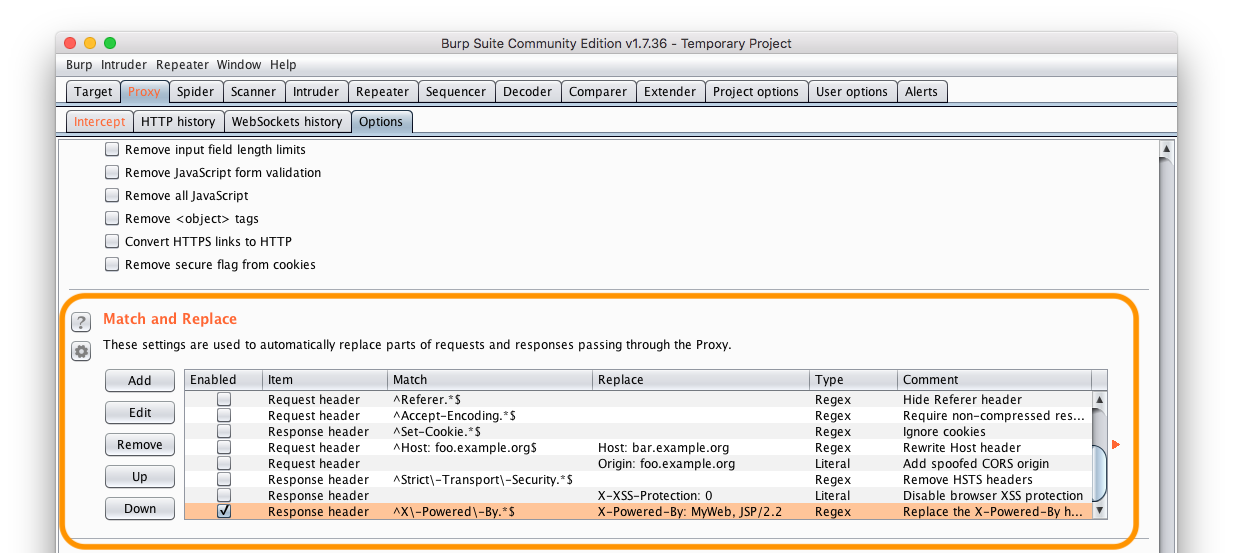
About halfway down the page, you’ll find the "Match and Replace" settings.

By default, Burp Suite comes with 12 pre-defined, yet disabled, rules, which can change the request and response headers. They’re an excellent starting point for learning how to create rules.

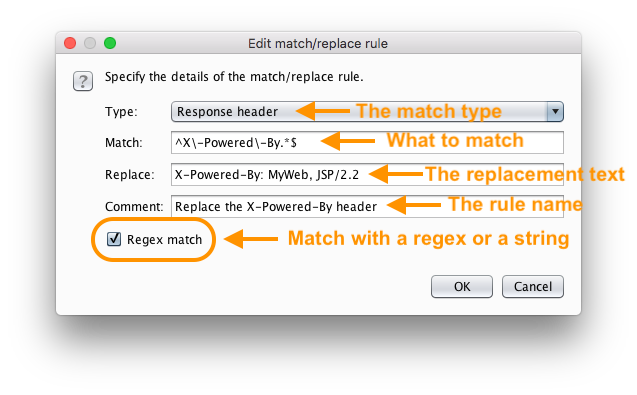
To create a new rule, as none of the pre-defined ones does what we need, click "Add", and you’ll see the new rule dialogue appear. Click the "Type" drop-down and click "Response header".
Then, add ^X-Powered-By.*$ as the "Match" criteria.
This string is a regular expression that matches on any header string that starts with X-Powered-By.
As there should be only one, if any, then a simple match is all we need.
Next, set the "Replace" text as X-Powered-By: MyWeb, JSP/2.2.
Then, set the "Comment" text to be Replace the X-Powered-By header.
And finally, check the "Regex match" checkbox, and click "OK".
Now, we have a new rule ready to go. After that, make sure you have some Proxy rules ready to go, so that you can intercept requests to a site that you know has an X-Powered-By header.
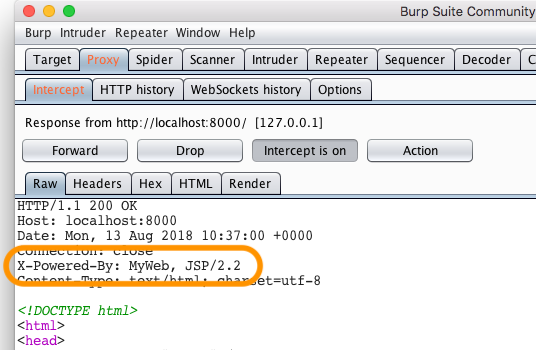
Then, make a request to the site and tell Burp Suite to intercept the response when you forward the request through Burp’s proxy.
When the response is intercepted, you’ll see in "Raw" response, that the X-Powered-By header’s been replaced on the fly for you, as in the image below.

Summary
And that’s how to automatically match and replace certain aspects of requests and responses, using Burp Suite. It’s a pretty handy tool for automating modifications, alleviating the need to do it manually each time. Have an experiment, and see what kinds of ideas and use cases you come up with for your testing needs.
As I’m still pretty new to using this aspect of Burp Suite’s functionality, I’d love to hear your experiences in the comments.
 Are you tired of hearing how "simple" it is to deploy apps with Docker Compose, because your experience is more one of frustration? Have you read countless blog posts and forum threads that promised to teach you how to deploy apps with Docker Compose, only for one or more essential steps to be missing, outdated, or broken?