 Are you tired of hearing how "simple" it is to deploy apps with Docker Compose, because your experience is more one of frustration? Have you read countless blog posts and forum threads that promised to teach you how to deploy apps with Docker Compose, only for one or more essential steps to be missing, outdated, or broken?
Testing is essential for creating reliable software. Whether you're writing a small application for your local club or an application to back your startup, it needs test coverage to ensure it works properly. In this series, I show you how to test Zend Framework 2 applications using the comprehensive testing framework - Codeception.
What is Codeception
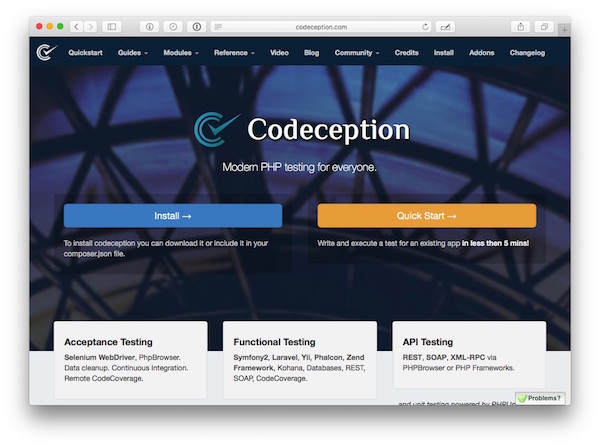
If you're not familiar with it, Codeception is a BDD-styled PHP testing framework for PHP, self-described as "Modern PHP testing for everyone".
Originally started by Michael Bodnarchuk (@davert) and now supported by a number of contributors, it's a test framework which allows us to do a range of types of testing, including Acceptance, Functional, and Unit tests, with a minimum of effort.
The original aim of the project was to be able to get started quickly. And whilst you can, the first time you encounter the project, you may feel that it doesn't necessarily live up to that aim.
After some time working with it, it does become easier, and you start to appreciate just how powerful and simple it is. But given that it does so much, it can feel slightly overwhelming at first.
So in this series, I'm going to show how to integrate it with a Zend Framework 2 application, based on the Zend Skeleton project.
We'll see how to install it, configure it, and run some basic functional and acceptance tests on the basic project which comes out of the box with the skeleton application.
In part two of the series, we'll see how to write more comprehensive tests, as well as how to unit test application controllers.
How Does Codeception Work
As Codeception implements BDD-style testing, similar in approach to Behat and phpspec, it uses the concept of an actor, who is the pseudo-person implementing the tests, whether they're functional, acceptance, or unit.
An actor is the main perspective in a Scenario file, which is both a description of the test, as well as the instructions which will be run in the test. Take the following test, which we'll run later:
<?php
$I = new FunctionalTester($scenario);
$I->wantTo('verify that the home page renders as expected');

$I->expectTo('be able to go to the about page');
$I->amOnPage('/');
$I->seeLink('About');
$I->click('About');
$I->seeCurrentUrlEquals('/about');
Here, we're creating a functional test and saying that we expect to see when the test succeeds, which is to verify that the home page renders as expected.
We then say that which page we're starting on, what we expect to see, and what should happen when we click a link. Similar to other testing frameworks, the tests are largely self-explanatory as, whether you're a developer or not, you can read them an understand what should be happening.
Installing It
Now that we have a basic understanding of what Codeception is and how it works, let's install it, integrating it with our project. There's a number of ways to do this, but the simplest is to use Composer.
It makes sense as we likely would have used Composer to create the basic Zend Framework 2 Skeleton application. So from the root of your project directory, in your terminal, run the following, which will add Codeception to your composer.json file, download it, and update Composer's autoloader:
composer require "codeception/codeception:*"
Creating the First Test - And Testing Directory
With that done, we need to generate our first test. By using the Codeception binary, we can save ourselves the trouble of creating all the related files and testing directory structure. To do that, run the following command, from the root of your project directory, in your terminal:
vendor/bin/codecept generate:cept acceptance Welcome
When the command completes, you'll see a new directory, in the project root, called tests. Under the tests directory, you'll see a number of others, and a range of configuration files. Most of these you don't need to touch, unless you want a specific configuration.
That's a handy part of Codeception, it works pretty well out of the box, but can be tweaked as needed. Before we look at the first test, we need to do two more things:
- Configure the Acceptance test module
- Add a Zend Framework 2 test configuration
Configuring the Acceptance Test Module
To configure it, first open tests/acceptance.suite.yml, and make sure it looks like the below configuration:
class_name: AcceptanceTester
modules:
    enabled:
        - PhpBrowser:
            url: http://localhost:8000/
        - \Helper\Acceptance
        - ZF2
What these do is to add the Zend Framework 2 helper and configure Codeception's PhpBrowser tool to use http://localhost:8000/ as the base url for running acceptance tests.
Add a Zend Framework 2 Test Configuration
Similar to other types of configuration in Zend Framework 2, we need to provide Codeception's Zend Framework 2 module with the configuration it needs to run the application. The file will be called application.config.php and located under /tests.
As this is a basic module with next to no dependencies, and only one module, the configuration file is quite small, setting the module to load, the module listener options, and the config glob path.
<?php
return array(
    'modules' => array(
        'Application',
    ),
    'module_listener_options' => array(
        'module_paths' => array(
            './module',
            './vendor',
        ),
        'config_glob_paths' => array(
            'config/autoload/{,*.}{global,local}.php',
        ),
    ),
);
If you're adding Codeception to an existing application, then your configuration file may likely be a lot more complicated. However, what's handy is that it follows the standard ZF2 skeleton configuration format.
With these configuration changes, made, we're ready to start looking at the first test.
Basic Acceptance and Functional Testing
Have a look at tests/acceptance/WelcomeCept.php which will contain the following:
<?php
$I = new AcceptanceTester($scenario);
That's not much, and won't do anything of value. Let's step through how to make a basic test. The intent of the test is to verify that the home page works as expected. To define what "expected" means, have a look at the screenshot below, which shows the home page.
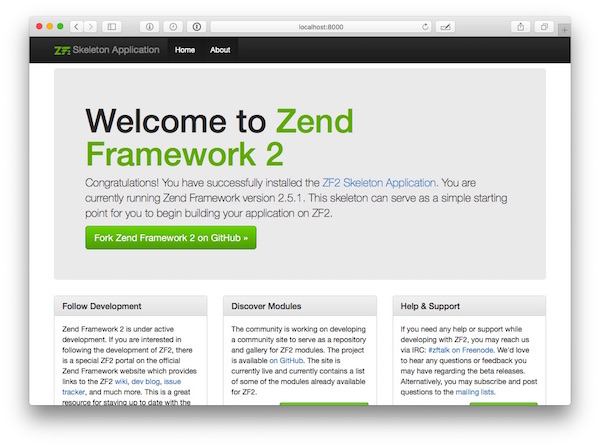
You can see that it contains a navigation bar across the top, a large Twitter Bootstrap jumbotron in the middle, and three columns covering the core ways of getting help with the project. Finally, at the bottom in the footer, it shows the project's copyright notice.
Let's look at how we can test most of that functionality in an acceptance test.
$I->am('guest user');
$I->wantTo('Check that the home page renders as it should');
$I->lookForwardTo('see the home page render correctly');
``

What we're doing here is to set the role of the user who will be executing the test, a logged out, or guest, user. Then, using the wantTo and lookForwardTo functions, state what the aim of the test is, and why it's being performed.

```php
$I->amGoingTo("Load the home page");
$I->amOnPage("/");
Next, we say what we're going to do in amGoingTo(), then do it with amOnPage, which requests the default route.
$I->seeInCurrentUrl('/');
$I->seeLink('Home');
$I->seeLink('Skeleton Application');
$I->see('Welcome to Zend Framework 2', 'h1');
$I->see('Congratulations! You have successfully installed the ZF2 Skeleton Application. You are currently running Zend Framework version 2.5.1. This skeleton can serve as a simple starting point for you to begin building your application on ZF2.', 'p');
$I->see('ZF2 Development Portal', 'a.btn-success');
$I->see('Explore ZF2 Modules', 'a.btn-success');
$I->see('Ping us on IRC', 'a.btn-success');
$I->see('Fork Zend Framework 2 on GitHub', 'a.btn-success');
$I->see('2005 - 2015 by Zend Technologies
            Ltd. All rights reserved.');
$I->seeNumberOfElements('a.btn-success', 4);
Next, we use the seeInCurrentUrl() method to check that the current url contains /, call the seeLink function twice to check that there are links containing the supplied text, then call the see() method repeatedly to check that the supplied text is available on the page, located in the DOM element supplied in the second parameter.
The last call, to seeNumberOfElements checks that the element exists in the document that many times.
$I->click('Home');
$I->seeInCurrentUrl('/');
Finally, we then simulate clicking on the Home link and check that the url is what we expect it to be, after the page has loaded. By executing all these methods, we're able to do a pretty reliable job of ensuring that the page renders as it should, and anyone reading the file should be able to quickly understand what we're intending to do.
Running the Test
Now that we have our first test in place, let's run it. Before we can do that, however, we need to make sure that our application is listening on port 8000. To ensure it is, run php -S localhost:8000 -t public from the project root, in your terminal, which will use PHP's in-built web server to handle all requests.
If this is your first time using PHP's in-built webserver to handle requests to Zend Framework applications, check out this short video for a fuller explanation.
Now that the application's running on port 8000, run the following command to launch the test:
php vendor/bin/codecept run acceptance
This will give you output similar to that below:
Codeception PHP Testing Framework v2.1.3
Powered by PHPUnit 4.8.12 by Sebastian Bergmann and contributors.

Acceptance Tests (1) -------------------------------------------------------------------------------------------------------------------
Check that the home page renders as it should (WelcomeCept)                                                                       Ok
----------------------------------------------------------------------------------------------------------------------------------------


Time: 190 ms, Memory: 19.50Mb
You can see that it lists the type of test, the number of tests, and then all the tests run. But what if you want more information. What if you were interested in seeing the status of each step in the process?
You might want to do this if one of the steps was failing, but you expected it to pass, or you were taking over an existing project and wanted to see the steps as you run the tests, so that you get up to speed quickly.
If that's the case, append the --steps switch to the command and run it again. This will give you output,like that below:
➜  codeception php vendor/bin/codecept run acceptance --steps
Codeception PHP Testing Framework v2.1.3
Powered by PHPUnit 4.8.12 by Sebastian Bergmann and contributors.

Acceptance Tests (1) -------------------------------------------------------------------------------------------------------------------
Check that the home page renders as it should (WelcomeCept)
Scenario:
* As a guest user
* So that I see the home page render correctly
* I am going to Load the home page
* I am on page "/"
* I see in current url "/"
* I see link "Home"
* I see link "Skeleton Application"
* I see "Welcome to Zend Framework 2","h1"
* I see "Congratulations! You have successfully installed the ZF2 Skeleton Application. You are currently running Zend Framework version 2.5.1. This skeleton can serve as a simple starting point for you to begin building your application on ZF2.","p"
* I see "ZF2 Development Portal","a.btn-success"
* I see "Explore ZF2 Modules","a.btn-success"
* I see "Ping us on IRC","a.btn-success"
* I see "Fork Zend Framework 2 on GitHub","a.btn-success"
* I see number of elements "a.btn-success",4
* I see "2005 - 2015 by Zend Technologies
            Ltd. All rights reserved."
* I see link "Home"
* I click "Home"
* I see in current url "/"
* I expect the page has loaded normally
 PASSED

----------------------------------------------------------------------------------------------------------------------------------------

Time: 209 ms, Memory: 19.50Mb
Improving the Test
As you can see, Codeception does a pretty good job of being very descriptive in what's going on. However, there's a potential problem with this approach. As we write a number of tests, there'll be a lot of setup work that's replicated across tests.
What we need is a way to reuse that setup, and tear down across the test that we write, where applicable. To do that, we create what is called a Cest file. A Cest file, in essence is a simple way of organising tests in to a class.
They provide a _before and _after method which, if you're familiar with PHPUnit, are analogous to its setUp and tearDown methods. As with the first test, Codeception provides good tooling support for setting up Cest files as well. To generate the file stub, run the following command:
php vendor/bin/codecept generate:cest acceptance HomePage
This will generate a new file, called tests/acceptance/HomePageCest.php. Now let's start fleshing it out, porting the logic from our first test. As the core of the test is to set expectations and load the home page, I'll move that to the _before method, making it look as follows:
    public function _before(AcceptanceTester $I)
    {
        $I->am('guest user');
        $I->wantTo('Check that the home page renders as it should');
        $I->lookForwardTo('see the home page render correctly');
        $I->amGoingTo("Load the home page");
        $I->amOnPage('/');
    }
I'll then move the rest of the logic to a new method called testTheHomePage, where it will look as follows:
    public function testTheHomePage(AcceptanceTester $I)
    {
        $I->seeInCurrentUrl('/');
        $I->see('Welcome to Zend Framework 2', 'h1');
        $I->see('Congratulations! You have successfully installed the ZF2 Skeleton Application. You are currently running Zend Framework version 2.5.1. This skeleton can serve as a simple starting point for you to begin building your application on ZF2.', 'p');
        $I->see('ZF2 Development Portal', 'a.btn-success');
        $I->see('Explore ZF2 Modules', 'a.btn-success');
        $I->see('Ping us on IRC', 'a.btn-success');
        $I->see('Fork Zend Framework 2 on GitHub', 'a.btn-success');
        $I->seeNumberOfElements('a.btn-success', 4);
        $I->seeLink('Home');
        $I->click('Home');
        $I->seeInCurrentUrl('/');
    }
To run that, as before, run the command, php vendor/bin/codecept run, optionally with the --steps switch. The output will now contain details about both tests.
Pay particular attention to the name of the test method and the name of the test in the test output. Here's a snippet from the test output, showing that it converts the test's name to the test identifier: Test the home page (HomePageCest::testTheHomePage).
Wrapping Up
And that's how to get started with Codeception to test your applications and ensure that they work as they're meant to. In part two of this series, we'll flesh out the acceptance tests we wrote today as well as write some functional and unit tests for testing application controllers. See you then.