 Are you tired of hearing how "simple" it is to deploy apps with Docker Compose, because your experience is more one of frustration? Have you read countless blog posts and forum threads that promised to teach you how to deploy apps with Docker Compose, only for one or more essential steps to be missing, outdated, or broken?
{{< youtube pc6sMarPpVo >}}
1. View the Last Commit
One of the things that I do on a pretty regular basis is refreshing my memory of the last commit. This can be for a number of reasons, but the most common is to see if I can merge further changes into the previous commit.
To make sure I can merge further work into it, I review the changes, along with the commit message and description. To do this, I'll typically use the following command:
git show
If no options are passed to it, this command shows the full details of the previous commit. This includes the commit hash, author, date, message, description, and changes.
2. Search Through a Commit
Let's say that the commit which you're looking at is quite large and detailed; an unfortunate mega-commit with changes far too numerous to filter through easily. How do you find what you're looking for intelligently, efficiently?
Well, by default, git uses less as its pager, which, together, lets you search through a commit. If you're not familiar with either of these terms, less is a program similar which allows forward and backward movement in file, and supports searching forward and backward within the file using regular expressions. A pager helps the user get the output one page at a time.
Because git uses less as its pager, you can use less' functionality to find the information that you want quite quickly, once you're familiar with it's search capabilities. Let's assume that the output below, something small enough, yet meaningful enough for an example, is a commit in your commit history.
commit 23219604b6b95e9f5858f81d671119d29c20bebe
Author: Matthew Setter <matthew@matthewsetter.com>
Date:   Wed Apr 24 17:11:23 2019 +0200

    Update the antora build script to support static redirects

    As per
    https://github.com/owncloud/docs/pull/982#pullrequestreview-230123586
    and the discussion in the rest of the PR, this change updates the build
    script to have Antora generate static redirects, if redirects are
    required.

diff --git a/package.json b/package.json
index 4c6495c..bffcb3d 100644
--- a/package.json
+++ b/package.json
@@ -30,7 +30,7 @@
   "scripts": {
     "prose": "write-good --parse **/*.adoc",
     "serve": "http-server public/ -d -i",
-    "antora": "antora --stacktrace generate --cache-dir cache --redirect-facility disabled --generator ./generator/generate-site.js --clean site.yml",
+    "antora": "antora --stacktrace generate --cache-dir cache --redirect-facility static --generator ./generator/generate-site.js --clean site.yml",
     "validate": "antora --stacktrace generate --cache-dir cache --redirect-facility disabled --generator ./generator/xref-validator.js --clean site.yml",
     "linkcheck": "broken-link-checker --filter-level 3 --recursive --verbose"
   },
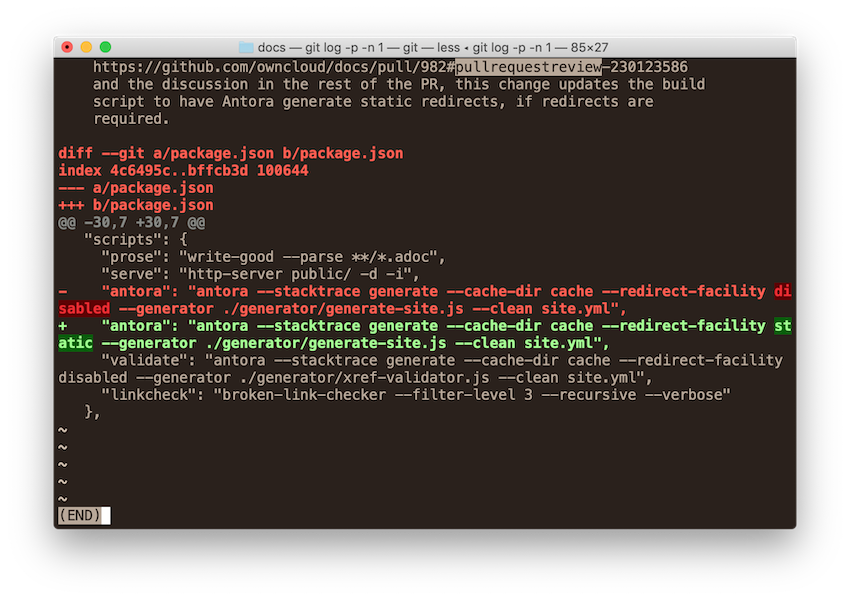
Now, let's say that you want to search for the string "pullrequestreview".
To do that, you'd press the forward slash character (/) and then enter the string "pullrequestreview".
If there is at least one match, you'll be moved to the first match and it will be highlighted, as you can see in the screenshot below.
If there isn't a match, then you'll see the following text at the bottom of the console: Pattern not found (press RETURN).
If there are several matches to the search term, you can navigate from the first to the last by pressing "n" on your keyboard.
Be aware that if you press "n" on the last match, you'll be taken back to the first match in the file.
If you want to search backwards in the file, instead of starting the search with a forward slash, start it with a question mark. Naturally, when searching backwards, if you click "n" to go to the next match, you'll move to earlier matches in the file.
If you want to use more sophisticated regular expressions, check out less' man page for details on the functionality which it supports.
3. Get The Names Of Files In A Commit
Now, let's say that you need to get a list of the files that were affected by one or more commits; perhaps because you need the information for a report, or someone just asked for them.
To find the list of files, you can use git log's --name-only option.
For the purposes of this example, let's assume that b977aaa2 is a commit's short hash.
You can find the files in a commit by running the following command:
git log b977aaa2 --name-only
This would show you output similar to the following:
commit f237e428786d489d89b5a9b53eeb15a4f2101c84
Author: Matthew Setter <matthew@matthewsetter.com>
Date:   Fri Dec 14 21:22:04 2018 +0100

    Add Disqus comment support

source/_layouts/blog.html
You can see that the output lists the files affected by the commit after the commit's message and description.
If you wanted to go a step further and see what changes were made to each file in the commit, then you could use --name-status instead, as in the example below.
git log b977aaa2 --name-status
This would add an "A", "M", or "D" before the name of each file, as in the example below
commit f237e428786d489d89b5a9b53eeb15a4f2101c84
Author: Matthew Setter <matthew@matthewsetter.com>
Date:   Fri Dec 14 21:22:04 2018 +0100

    Add Disqus comment support

M       source/_layouts/blog.html
Note: you cannot use -p and one of --name-only or --name-status at the same time.
4. Interactively Stage Files
Time for the last tip, how to stage files (or parts of files) interactively.
Perhaps you're used to using git add to add files individually such as by git add path/to/your/file, or to add multiple files of a specific type, such as git add **/*.php.
These approaches are efficient if you want to stage every change to one or more files. But, if you only want to stage some changes from a list of files, then you need to stage files interactively.
To start doing so, you run the command: git add -i or git add --interactive.
This will display a numbered list of files that can be staged, followed by a list of commands, as in the following example
           staged     unstaged path
  1:    unchanged        +1/-1 source/_includes/header.twig
  2:    unchanged        +1/-1 source/_layouts/blog.html
  3:    unchanged        +1/-0 source/_posts/2018-04-24-can-you-trust-facebook-with-your-privacy.md
  4:    unchanged        +1/-1 source/_posts/2018-10-18-saving-time-with-makefiles.md
  5:    unchanged        +1/-1 source/_posts/2018-11-13-antora-core-concepts.md
  6:    unchanged       +12/-4 source/_posts/2018-12-21-linting-markdown-files.md
  7:    unchanged      +39/-36 source/_posts/2019-01-29-broken-link-checker.md
  8:    unchanged      +67/-48 source/_posts/2019-02-05-write-good.md
  9:    unchanged       +39/-2 source/assets/css/supplemental.css

*** Commands ***
  1: status   2: update   3: revert   4: add untracked
  5: patch    6: diff     7: quit     8: help
While there are a number of commands after the file list, I'm only focusing on patch, and leaving the other commands for you to explore at your leisure. To stage files, press "5", which shows the list of files, minus the commands at the bottom.
You then specify the files that you want to stage in one of three ways, and press "Enter":
- As a comma-separated list, e.g.,
"1,3,4,5,6" - As a range, e.g.,
"1-5" - As a combination of a comma-separated list and a range: e.g.,
"1.5,6,8"
Regardless of the approach that you take, you'll see a confirmation list the files to be interactively staged, as in the following example. Each file to be interactively staged will have an asterisk to its left.
           staged     unstaged path
* 1:    unchanged        +1/-1 source/_includes/header.twig
* 2:    unchanged        +1/-1 source/_layouts/blog.html
* 3:    unchanged        +1/-0 source/_posts/2018-04-24-can-you-trust-facebook-with-your-privacy.md
* 4:    unchanged        +1/-1 source/_posts/2018-10-18-saving-time-with-makefiles.md
* 5:    unchanged        +1/-1 source/_posts/2018-11-13-antora-core-concepts.md
* 6:    unchanged       +12/-4 source/_posts/2018-12-21-linting-markdown-files.md
  7:    unchanged      +39/-36 source/_posts/2019-01-29-broken-link-checker.md
* 8:    unchanged      +67/-48 source/_posts/2019-02-05-write-good.md
  9:    unchanged       +39/-2 source/assets/css/supplemental.css
Note: once selected to be staged, you cannot unselect a file.
If you're happy with the nominated files, press "Enter".
After doing so, you'll then see the first hunk of the first file in the list, followed by the following output: Stage this hunk [y,n,q,a,d,/,e,?]?.
For clarity, a hunk is:
A sequence of lines common to two files in a diff, interspersed with groups of differing lines.
Here's an example of one from a recent commit that I made:
diff --git a/source/_includes/header.twig b/source/_includes/header.twig
index 0b823b5..23b7e92 100755
--- a/source/_includes/header.twig
+++ b/source/_includes/header.twig
@@ -35,7 +35,7 @@
     <link rel="stylesheet" href="/assets/vendor/slick-carousel/slick/slick.css">

     <!-- CSS Global Compulsory -->
-    <link href="https://fonts.googleapis.com/css?family=Noto+Sans|Noto+Serif:700" rel="stylesheet">
+    <link href="https://fonts.googleapis.com/css?family=Lora|Roboto:500,700" rel="stylesheet">

     <!-- CSS Front Template -->
     <link rel="stylesheet" href="/assets/css/theme.css">
When viewing one, you can press:
- y: to add it
- n: to not add it
- q: to not stage this hunk, nor any other in any other file
- a: to stage this and all following hunks
- d: to not stage this hunk, nor any other in the current file
There are several other options that you can choose, but I'll leave them up to you to explore.
While interactively staging files can be slow, I often find the process enlightening. And, because you can only work on one hunk at a time, it's hard to stage the wrong thing.
What I do find frustrating, however, is that you can't stage just a few lines from a hunk when interactively staging files from the command-line. There have been several times when I've wanted to stage just one or two lines, but That said, for those situations, one of GitX or GitG make it a breeze.
Want To Patch Straightaway?
If you want to dive right in and not worry about choosing which file(s) to stage, you can use git add -p or git add --patch instead, as in the following example.
# Start interactively staging all AsciiDoc files
git add --patch **/*.adoc
According to git add’s documentation:
This effectively runs add --interactive, but bypasses the initial command menu and directly jumps to the patch subcommand.
So, when you run this, you’ll be taken directory to the first hunk in the first available file, and be able to choose whether to stage it or not. If you use this option, consider using an appropriate path spec (or glob expression) so that you don’t have to work through files unnecessarily.
In Conclusion
And those were four tips for using git, from the command-line, more effectively. Sure, they're not the most sophisticated tips, but they all provide the opportunity to help you use git that much better, and save you time and effort while doing so.
Have I missed something? What would you do differently?