 Are you tired of hearing how "simple" it is to deploy apps with Docker Compose, because your experience is more one of frustration? Have you read countless blog posts and forum threads that promised to teach you how to deploy apps with Docker Compose, only for one or more essential steps to be missing, outdated, or broken?
In 2025, it might seem like a strange idea to step through how to install the PHP Memcached extension — especially when you're running PHP inside a Docker container.
However, it's an issue that I came across (again) lately. What's more, from doing some searching, it seems to still be an issue that others are having too. So, I thought it worth documenting how to install and enable it, now that I've gotten the process worked out.
For this tutorial, I'll be using Docker Compose, as I find it easier to work with than individually starting and stopping Docker containers.
If you're not familiar with Docker Compose, download a (free) copy of Deploy With Docker Compose. It's a book I wrote, that gives you all you need to know to get started with Docker Compose and a simple approach to deploying apps.
Note: If you prefer Podman, the commands should work equally as well, though I've not tested them.
One last thing that I should cover before diving into the details, is that the setup that I'll show you is specific (think package names) to the base image used. If you prefer to use a different base image, then you'll have to do some research as the package names may be slightly — or very — different.
With that, let's begin!
What You'll Need
To follow along with this tutorial, you'll need the following:
- Docker Desktop or Podman
- Git
- Composer installed globally
- Your text editor or IDE and web browser of choice
- Some prior experience with containers and the Linux command-line would be helpful, but is not necessary
Our demo app
To make the tutorial more meaningful than me just telling you what to do, it's centred around the fictitious need to run a small app that does some basic checks for whether the current PHP runtime has proper support for Memcached. When it's up and running, here's what it will look like:
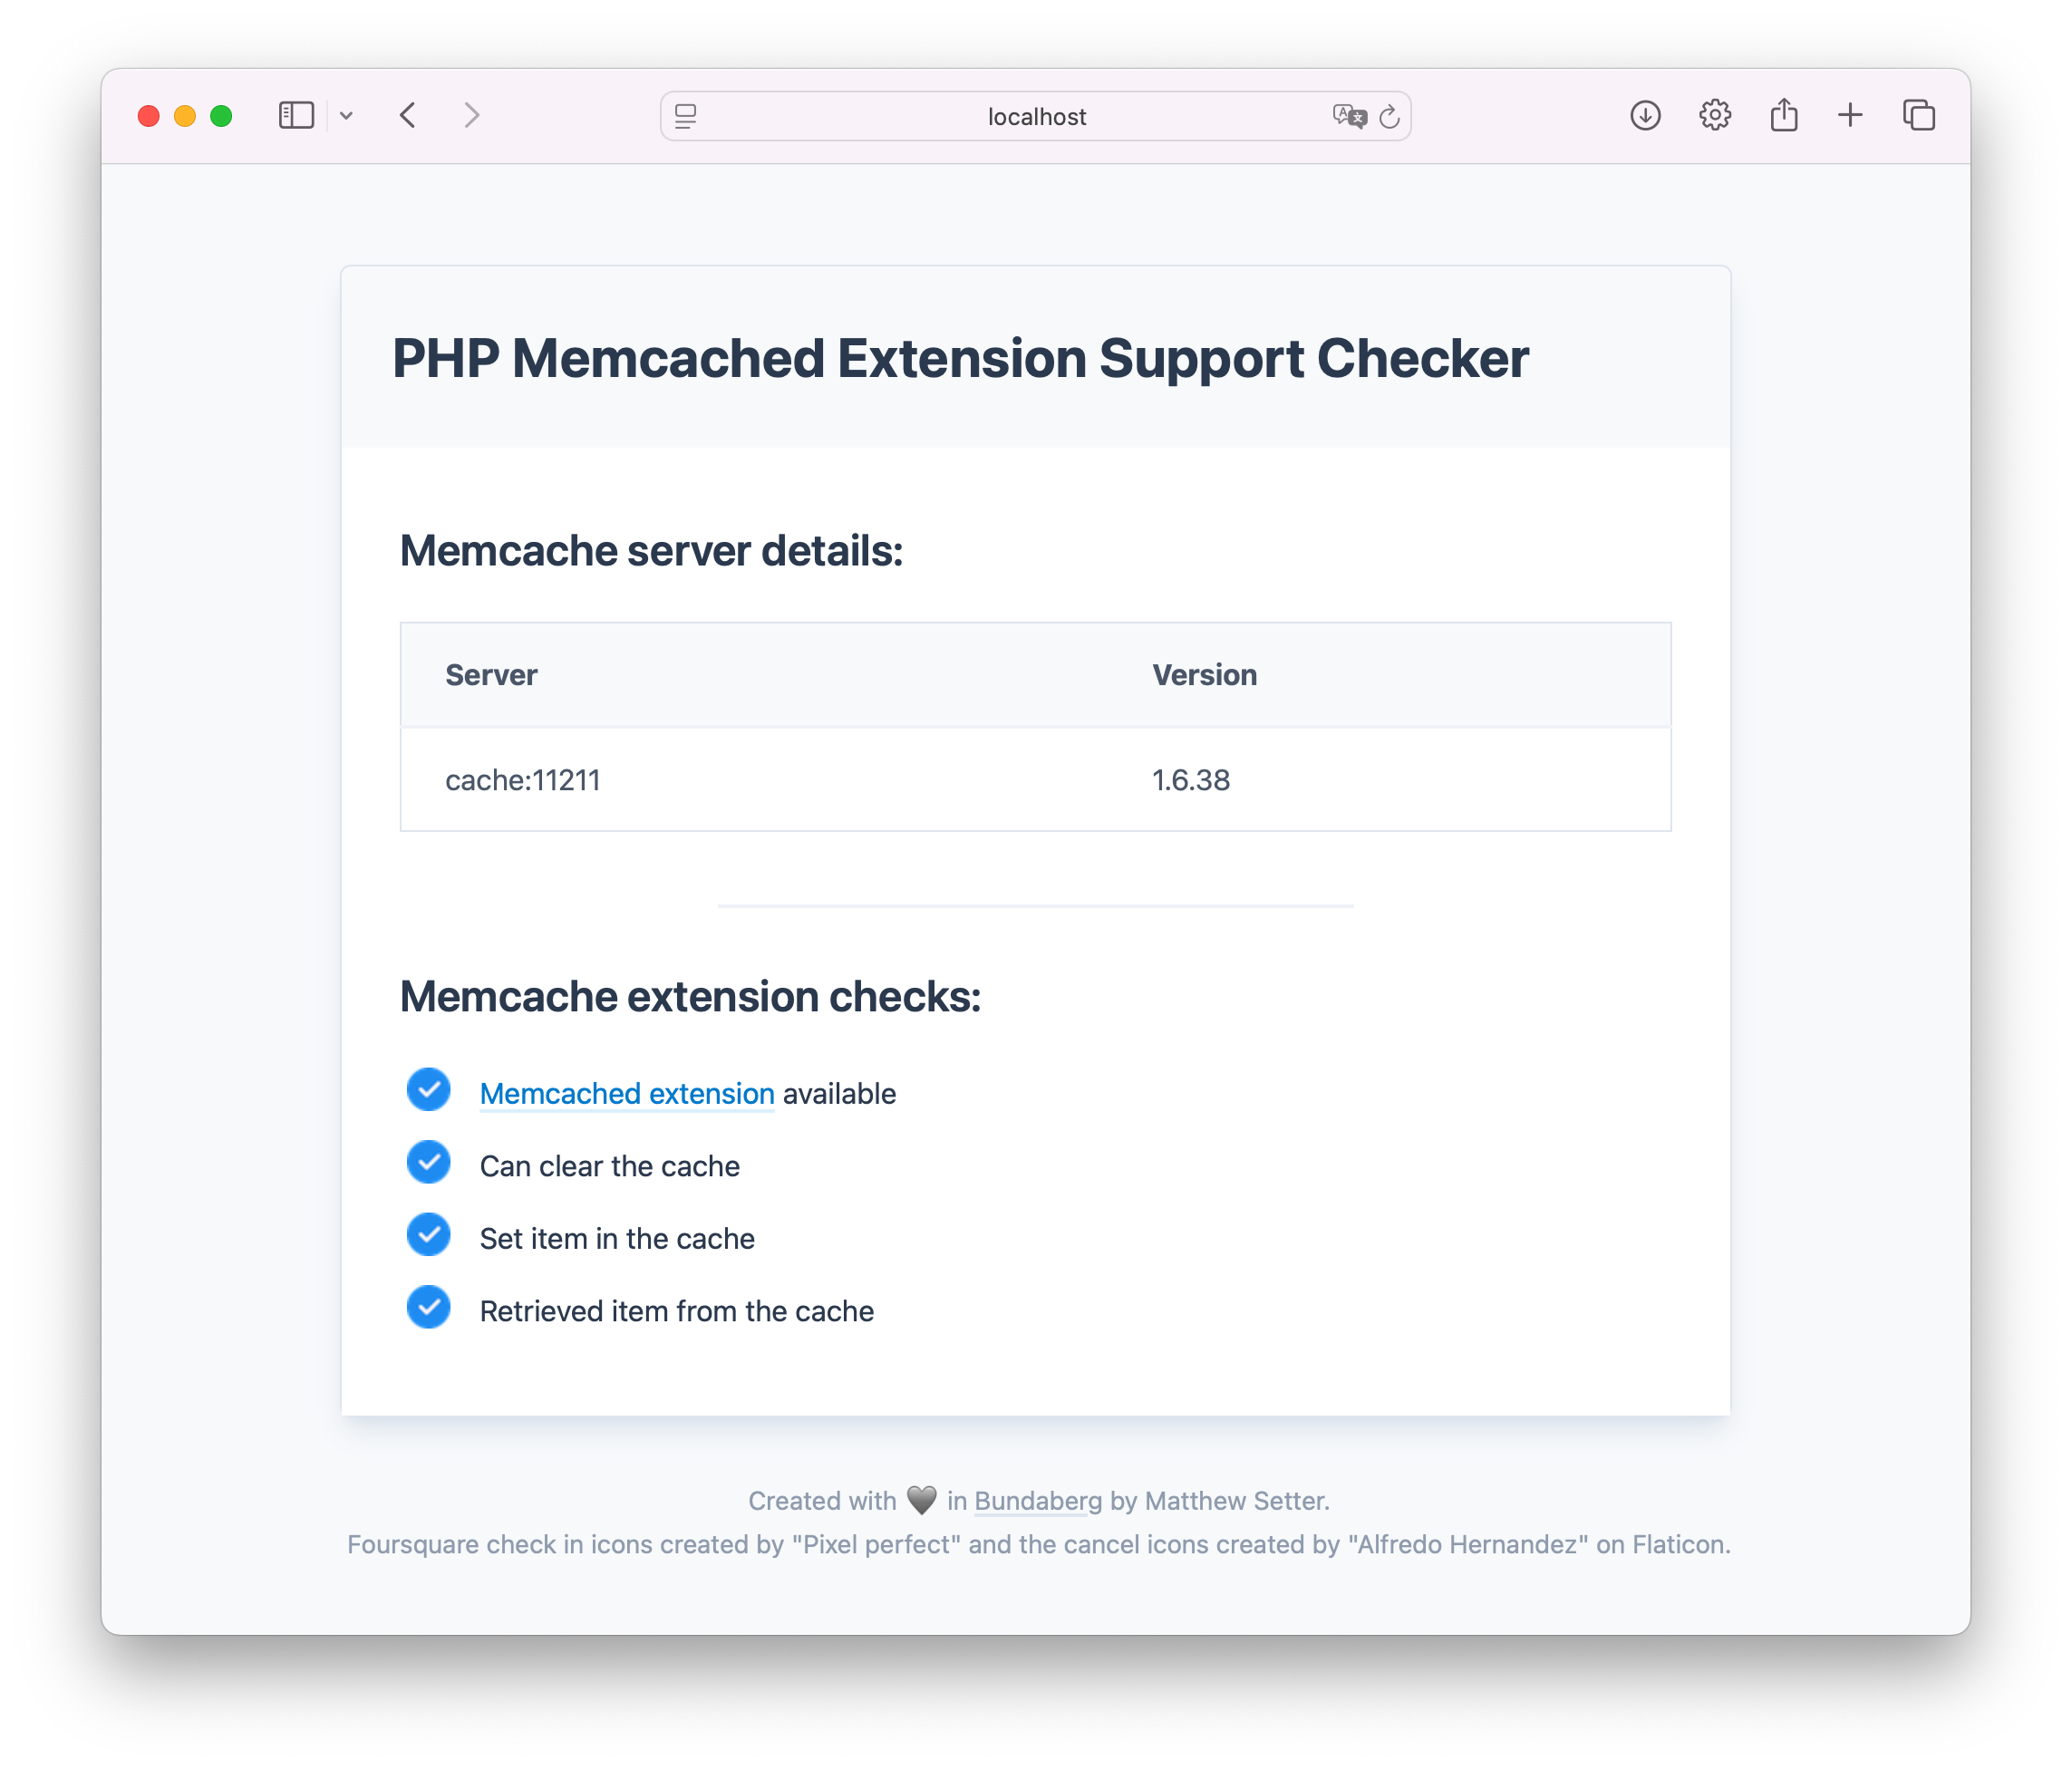
You can see that it lists the Memcached servers that it is connecting to and their versions. Then, it checks if:
- The Memcached extension is available
- The cache can be cleared
- An item can be set in and retrieved from the cache
Nothing special, but it's enough to know if the current PHP runtime can interact with Memcached or not.
The app will be run using a basic Docker Compose configuration, consisting of two containers: one for Apache 2 which hands off dynamic requests to PHP via the Apache-MPM prefork module. The other container will run Memcached.
Set up the project
The first thing to do is to clone the demo project repository, wherever you keep your PHP projects, change into it, and install PHP’s dependencies. To do that, run the following commands:
git clone git@github.com:settermjd/php-memcache-demo-app.git
cd php-memcache-demo-app
composer install
Next, you need to create the directory structure for storing the Docker files. Do that by running the following command:
mkdir -p docker/webserver
If you’re using Microsoft Windows, you don’t need the -p option.
The command created a directory named docker where all the Docker-related files, such as Docker Compose's core configuration file, compose.yml will be stored. It then created a directory named webserver inside the docker directory. This directory will contain files specific to the container that has the PHP runtime; and is named after that container.
This directory structure isn't a hard requirement. It's just an ad-hoc convention I use for projects that use Docker or Docker Compose.
Create the Docker Compose configuration
The next thing to do is create Docker Compose's configuration file, compose.yml in the project's top-level directory. Then, in the file paste the configuration below.
services:
  webserver:
    build:
      context: ./
      dockerfile: docker/webserver/Dockerfile
    ports:
      - "8080:80"
    volumes:
      - ./:/var/www/html

  cache:
    image: memcached:1.6.38-bookworm
    ports:
      - "11211:11211"
The configuration defines two services:
- webserver: This runs Apache 2 which connects to the PHP runtime using Apache's MPM Prefork module. It uses the "8.4-rc-apache-bookworm" tag of the official Docker Hub PHP image; an image with pretty bare bones support for PHP. As we're adding the Memcached extension, we'll need to extend it. To do that, the container's configuration uses a Dockerfile in the docker/webserver directory to build a custom image, which we'll define next. Otherwise, it:
- Maps port 80 in the container to port 8080 on the local development machine
- Maps the local development directory to /var/www/html in the container
- cache: This container is based on the "1.6.38-bookworm" tag of the official Docker Hub Memcached image; the latest version at the time of writing. It maps port 11211 in the container to the same port on your development machine. Unlike the "webserver" container, we don't need to make any changes to the base image.
I've chosen the (Debian 12.0) bookworm tags of both images as I'm a big Debian fan for development and production. While Debian doesn't use bleeding-edge packages and binaries, it's a more stable — perhaps the most stable — Linux distribution, something that you want when deploying applications.
Next, create a new file named Dockerfile in docker/webserver and paste the configuration below into the file.
ARG PHP_VERSION=8.4

FROM php:${PHP_VERSION}-rc-apache-bookworm AS base

RUN set -eux; \
    apt-get update && \
    apt-get install -y --no-install-recommends \
            libmemcached-dev \
            libssl-dev \
            libzip-dev \
            libzip4 \
            zlib1g-dev && \
    printf "" | pecl install -D 'with-libmemcached-dir="/usr"' memcached && \
    docker-php-ext-enable memcached && \
    rm -rf /var/lib/apt/lists/*

RUN a2enmod rewrite

ENV APACHE_DOCUMENT_ROOT /var/www/html/public
RUN sed -ri -e 's!/var/www/html!${APACHE_DOCUMENT_ROOT}!g' /etc/apache2/sites-available/*.conf
RUN sed -ri -e 's!/var/www/!${APACHE_DOCUMENT_ROOT}!g' /etc/apache2/apache2.conf /etc/apache2/conf-available/*.conf
The configuration starts off by defining the base image, as mentioned previously, it's the "8.4-rc-apache-bookworm" tag of the official Docker Hub PHP image. The configuration uses multi-stage builds which, while not strictly necessary, can come in very handy, if the configuration grows over time; after all, things that start off small often end up growing.
Then, the memcached PHP extension is installed and enabled. This is the heart of this tutorial, so let me dive into the weeds a little to cover it sufficiently.
As the image is based on Debian, the RUN instruction updates the APT cache (Debian's superb package manager) and then installs the development dependencies needed to build and install the extension.
After that, it uses Pecl to build and install Memcached. An empty string is piped to the install process to answer most of the prompts asked during the install.
If you're interested, I believe the following is the full list at the time of writing:
- "libmemcached directory [no]": This is the base path to libmemcached. You can directly answer this question by setting the
--with-libmemcached-diroption. - "zlib directory [no]": This is the base path to zlib
- "use system fastlz [no]"
- "enable igbinary serializer [no]"
- "enable msgpack serializer [no]"
- "enable json serializer [no]"
- "enable server protocol [no]"
- "enable sasl [yes]"
- "enable sessions [yes]"
We could answer the prompts directly, as we did with -D 'with-libmemcached-dir="/usr"' to provide the base path to the libmemcached directory. But, as we're only answering one prompt, we use printf to answer the remaining questions with the default answer.
If this is your first time seeing this approach, what happens is that the default option will be used for each of the prompts. If, however, you wanted to give specific answers, you'd have to provide answers for each question.
It's important to note that when passing options to the -D option that you have to both single-quote the entire string, and double-quote the answers for each option; e.g., 'with-libmemcached-dir="/usr"'. If /usr were not double-quoted, the install would fail with an exception similar to the following
PHP Fatal error: Uncaught TypeError: array_key_exists(): Argument #2 ($array) must be of type array, null given in /usr/local/lib/php/PEAR/Builder.php:397
A big thank you to Ezekiel Aikle for pointing this out.
Then, it calls the docker-php-ext-enable utility, which comes with the official Docker Hub PHP image to enable the Memcached extension.
The remainder of the Dockerfile changes Apache's default document root from /var/www/html to /var/www/html/public which is where the demo app for this tutorial needs it to be.
Start the containers
And that's it for the configuration. So, start up the configuration by running the command below.
docker compose up
The first time you run the command, if you don't have one or both of the base images in your local Docker image cache, they'll have to be downloaded first. So, allowing for the speed of your internet connection, this might take a minute or two. However, all subsequent starts will happen a lot quicker.
The containers are intentionally not put into detached mode, so that the Docker logs are printed to the current terminal's output. That way, we don't have to tail the logs to find out if something went wrong during startup.
Check that the extensions are installed in the webserver container
You shouldn't see any errors in the logs, but just to be sure that the extensions are installed and enabled, in a separate terminal tab or session, run the command below.
docker compose exec webserver \
    /bin/bash -c "php -m | grep -E memcached"
This runs php -m | grep -E memcached in the webserver container. Breaking it down, it pipes the output of php -m, which lists all of PHP's modules to grep, which checks if "memcached" is in php -m's output. You should see it printed to the terminal's output.
Test that the application works
At this point, PHP should be ready to interact with Memcached. However, let's run the application just to be sure. So, in your browser of choice, open http://localhost:8080, where you should see it render like the screenshot below.
That's how to install the PHP Memcached extension when using Docker
At its core, there's not a lot to it. However, figuring out just the steps required was something that took about 2 - 3 hours of research and experimentation. I hope that this helps you out, if you're having trouble installing and enabling the Memcached extension to your PHP container.