 Are you tired of hearing how "simple" it is to deploy apps with Docker Compose, because your experience is more one of frustration? Have you read countless blog posts and forum threads that promised to teach you how to deploy apps with Docker Compose, only for one or more essential steps to be missing, outdated, or broken?
For the longest time, I've been using VIM to write and maintain AsciiDoc content. I've used it when working with my technical documentation clients and for the books and courses which I've created.
I love how VIM is so lightweight, so configurable, so easy to use. However, there are little things that it doesn't do, or I've either not found a plugin, or coded up a plugin to do.
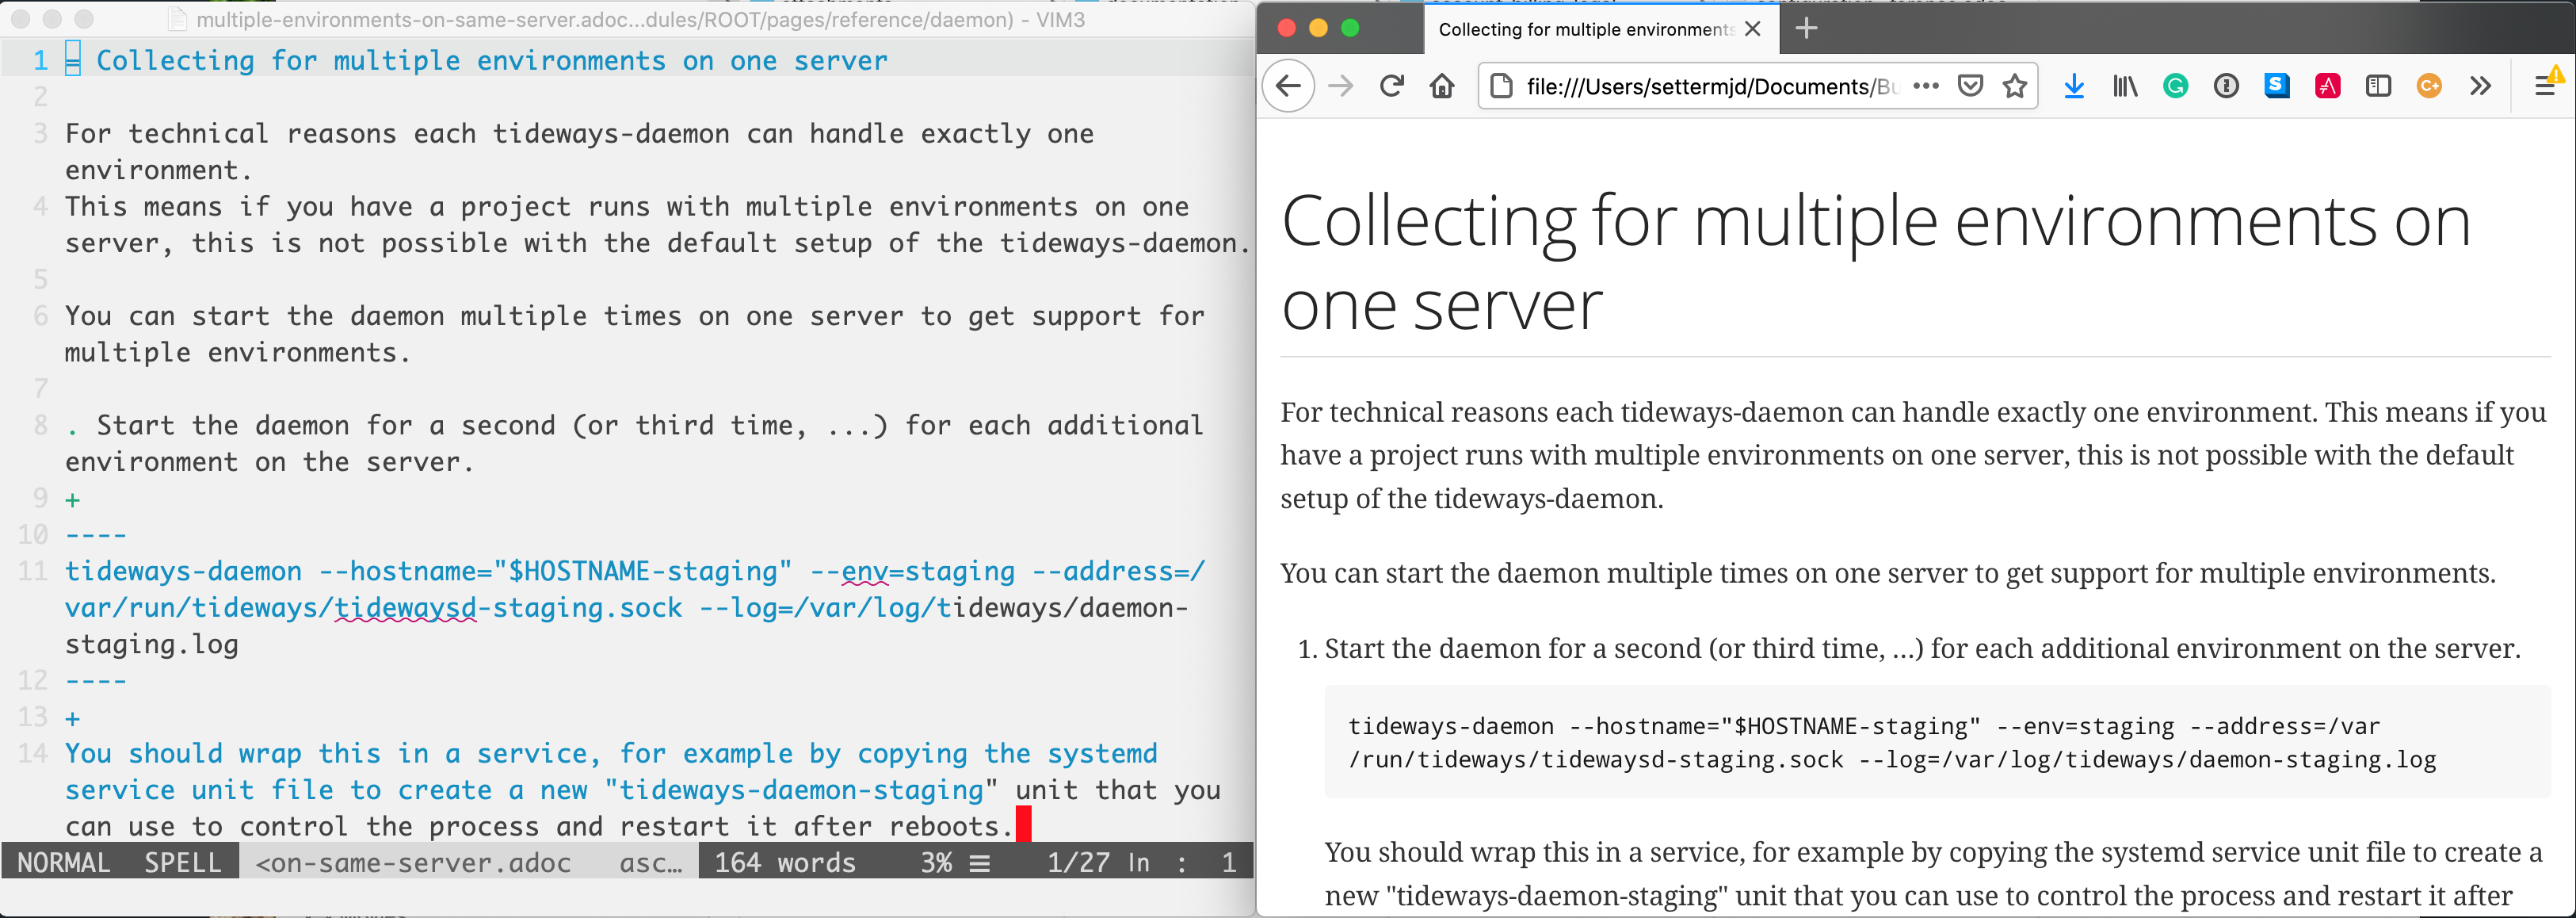
For example, have I attempted to include an image or file using an incorrect file path. What's more, it has no native preview functionality. However, this isn't a deal-breaker, as I've also been using (and advocating) the Asciidoctor.js Live Preview plugin for Firefox and Chrome. As you can see in the image below, I can write and preview, virtually, at the same time.
In the search for solutions to these, often minor, shortcomings in VIM, I've been seeking answers and workarounds in the Antora users Gitter forum and the AsciiDoc sub-channel in the Write the Docs Slack channel. Everyone's been very helpful.
However, of all the suggestions which I've received, the one I've heard the most, and the one that's been advocated for most strongly, is by AsciiDoc and Antora project lead, Dan Allen. He's been strongly advocating for the AsciiDoc Plugin for IntelliJ.
To be honest, I'd wanted to improve my VIM configuration, not to start with another tool. However, Dan is very enthusiastic, and often very convincing. So, after he kept suggesting it for over 6 weeks, I decided to trial it for 4 weeks, exclusively, as my AsciiDoc editor, and see why he was so enthusiastic.
What is the AsciiDoc Plugin for IntelliJ?
The plugin is primarily developed and maintained by Alexander Schwarz (ahus1), who's a very active member of the AsciiDoc and Antora communities. It's officially described as:
A plugin for the IntelliJ platform (IntelliJ IDEA, RubyMine, and PhpStorm, etc.) that provides support for the AsciiDoc markup language. It also supports Antora, the documentation CMS build with AsciiDoc.
Here are the key features:
- An AsciiDoc context-sensitive editor, with syntax highlighting, auto-completion, and in-line validation messages
- A configurable AsciiDoc preview for proof-reading AsciiDoc content
- Integrates with:
- A Markdown-to-AsciiDoc converter
- In-line diagrams like PlantUML
- Antora; and
- Spring REST docs
Now, on their own, these are some pretty awesome features. However, when you consider that the functionality of the plugin is combined with all of the pre-existing functionality available in IntelliJ IDEs, and with the functionality of any additional you may add, I hope that you start to see just how powerful a technical writing setup it presents.
What’s more, here’s what AsciiDoc (and Antora) project lead, Dan Allen, says about it:
It takes a lot of effort to do what @ahus1de and team have done and I really appreciate their hard work and dedication. Hopefully, it's infectious (in the good way).
Where the Plugin Shines
Excellent Syntax Highlighting Support
I honestly didn't expect the syntax highlighting to be as good as it is. Sure, I've been using PhpStorm, one of the IntelliJ IDEs for some time as my primary PHP editor, and have used IntelliJIDEA for Java and Kotlin.
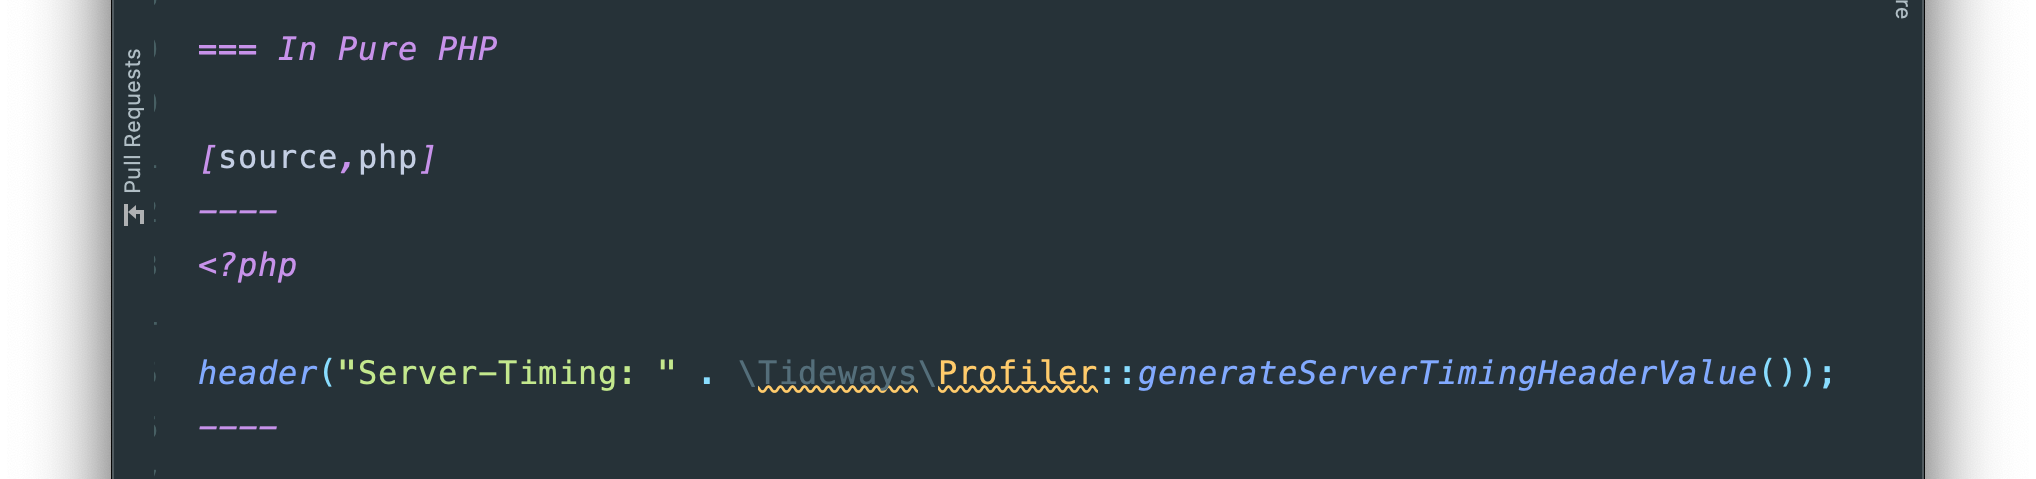
So I'm aware of the quality of the syntax highlighting. What I didn't expect, however, was that the syntax highlighting would extend to source code blocks.
I'm used to seeing syntax highlighted in Firefox, when using the Asciidoctor.js plugin, but not directly in VIM. That's actually a bit of what motivated me to start including source files, instead of embedding source code directly in AsciiDoc.
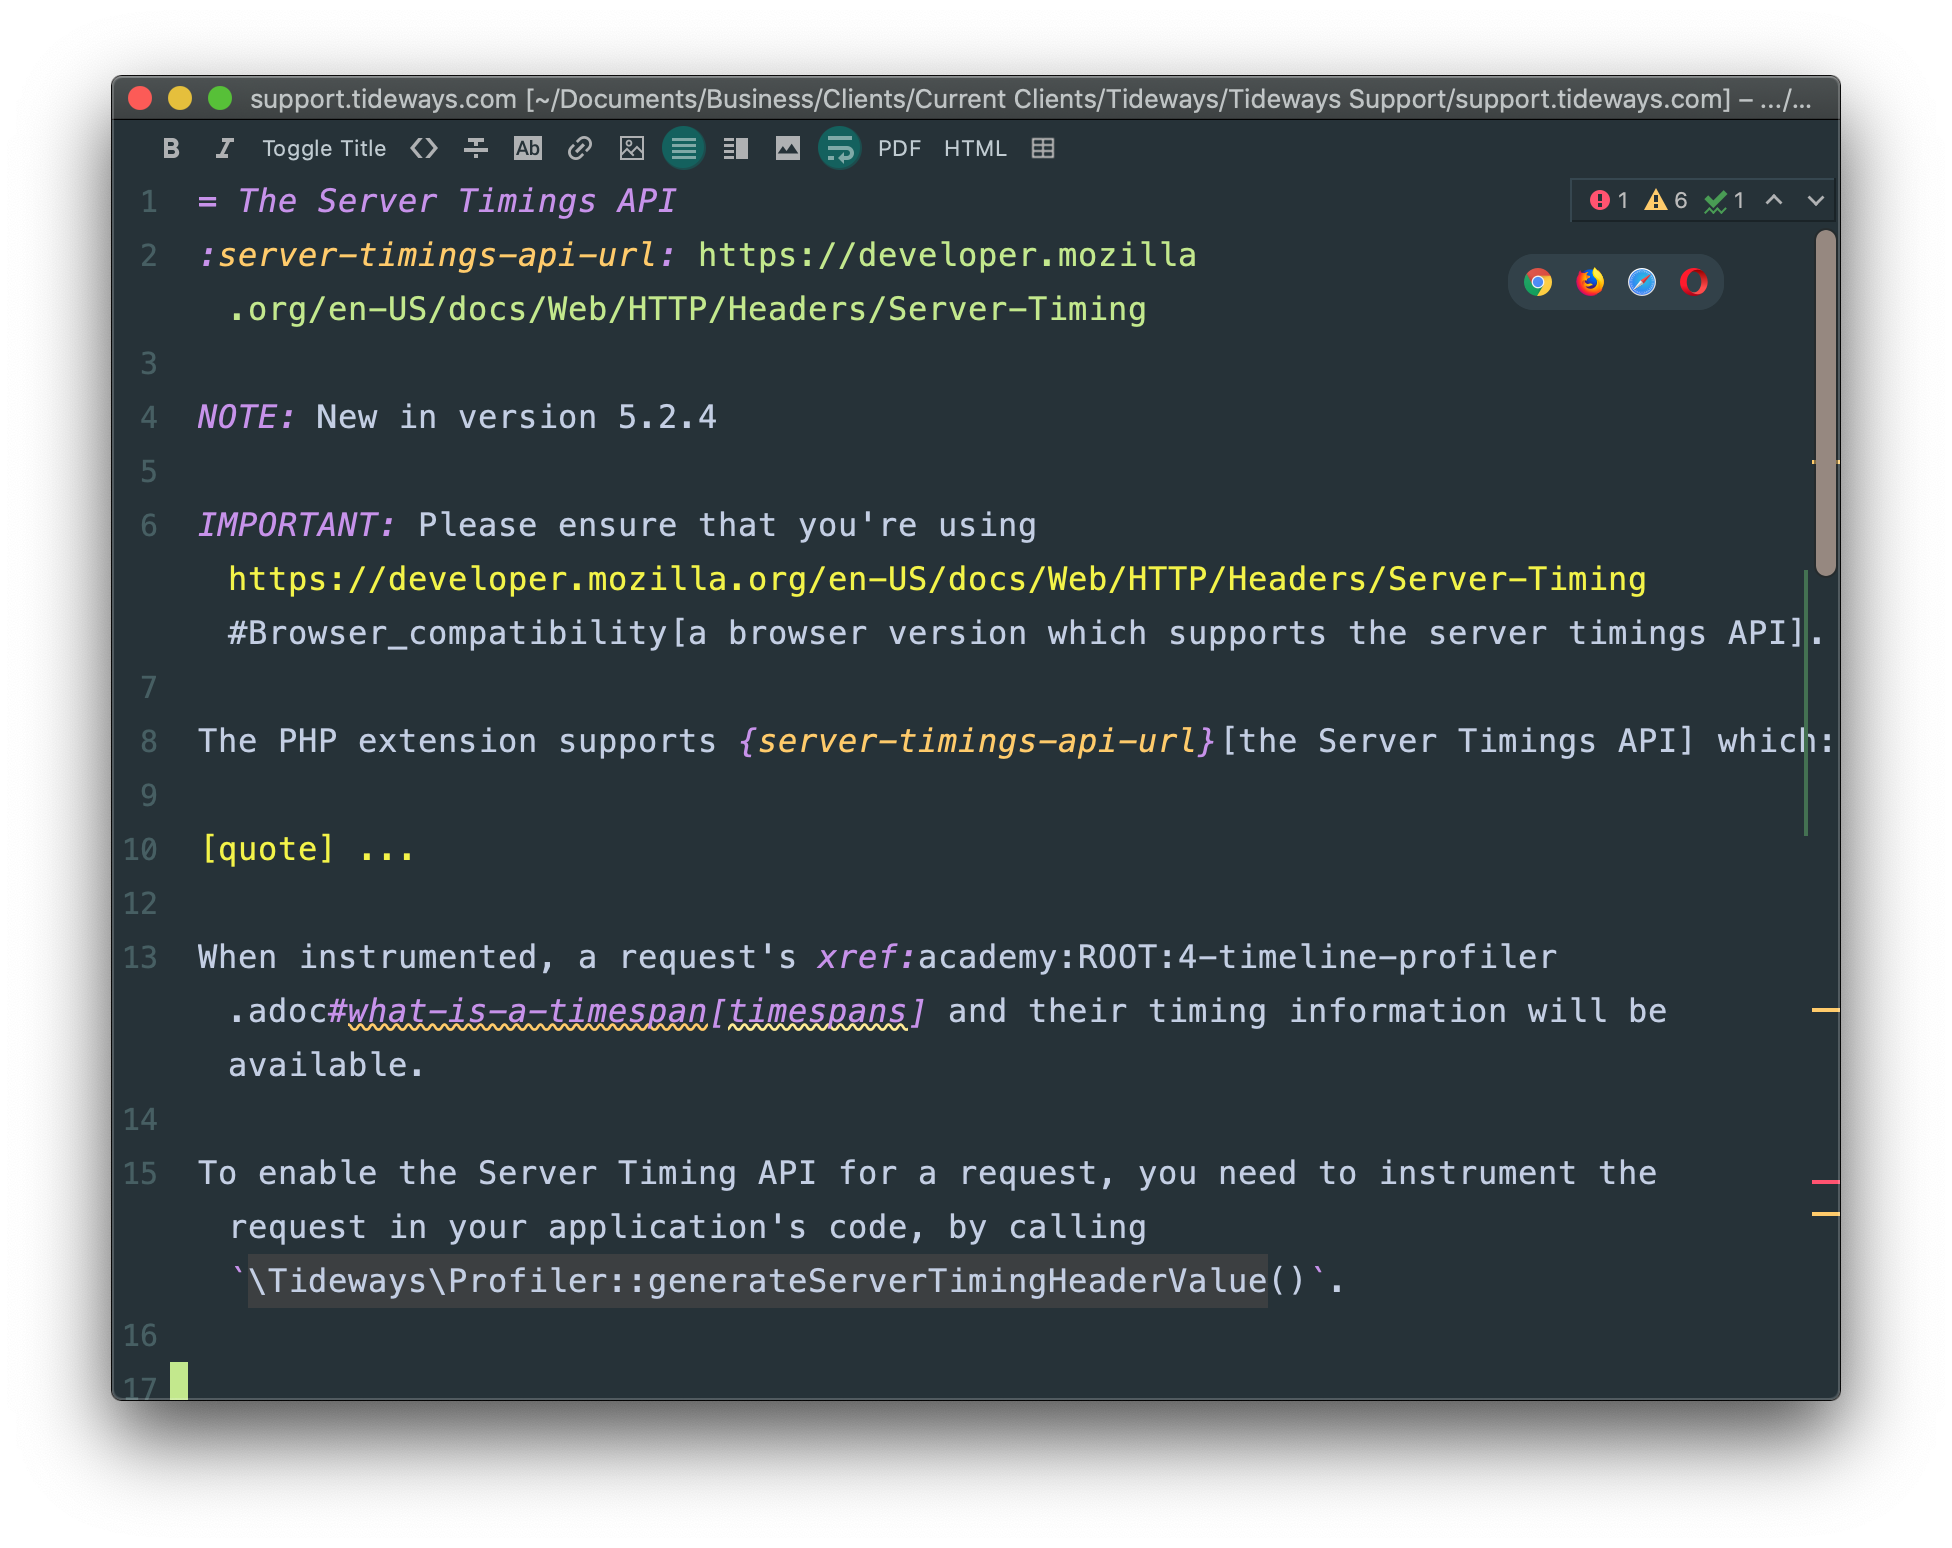
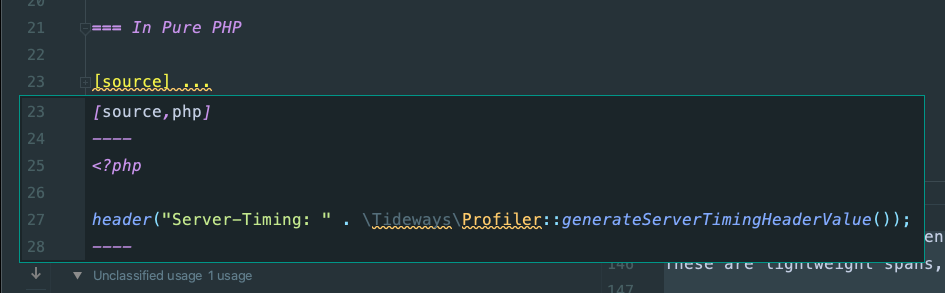
So imagine my surprise as I was setting the source language type in a source code block recently, and witnessed beautiful syntax highlighting take hold. I was stunned! Take a look at the screenshot below. Perhaps you will be too.
Now, if you appreciate how much of a wonderful surprise that was, imagine my further surprise when, after setting the source code type, I saw IntelliJ start linting the source code block. In the screenshot below, you can see that on line five, it's found an undefined variable. This is excellent stuff.
Sure, by storing source code in external files, it can be linted as part of the build process, by git hooks, and manually by me, which will ensure that the code is bug-free. However, editing the code directly in the AsciiDoc file sure can be convenient at times.
So it's exciting to know that all of IntelliJ's native code intentions and inspections and syntax highlighting are available to you. Oh, did I mention that this functionality extends to diff and merge tools too?!
This functionality is configurable if you feel that it's not what you want, or you need to change it a bit.
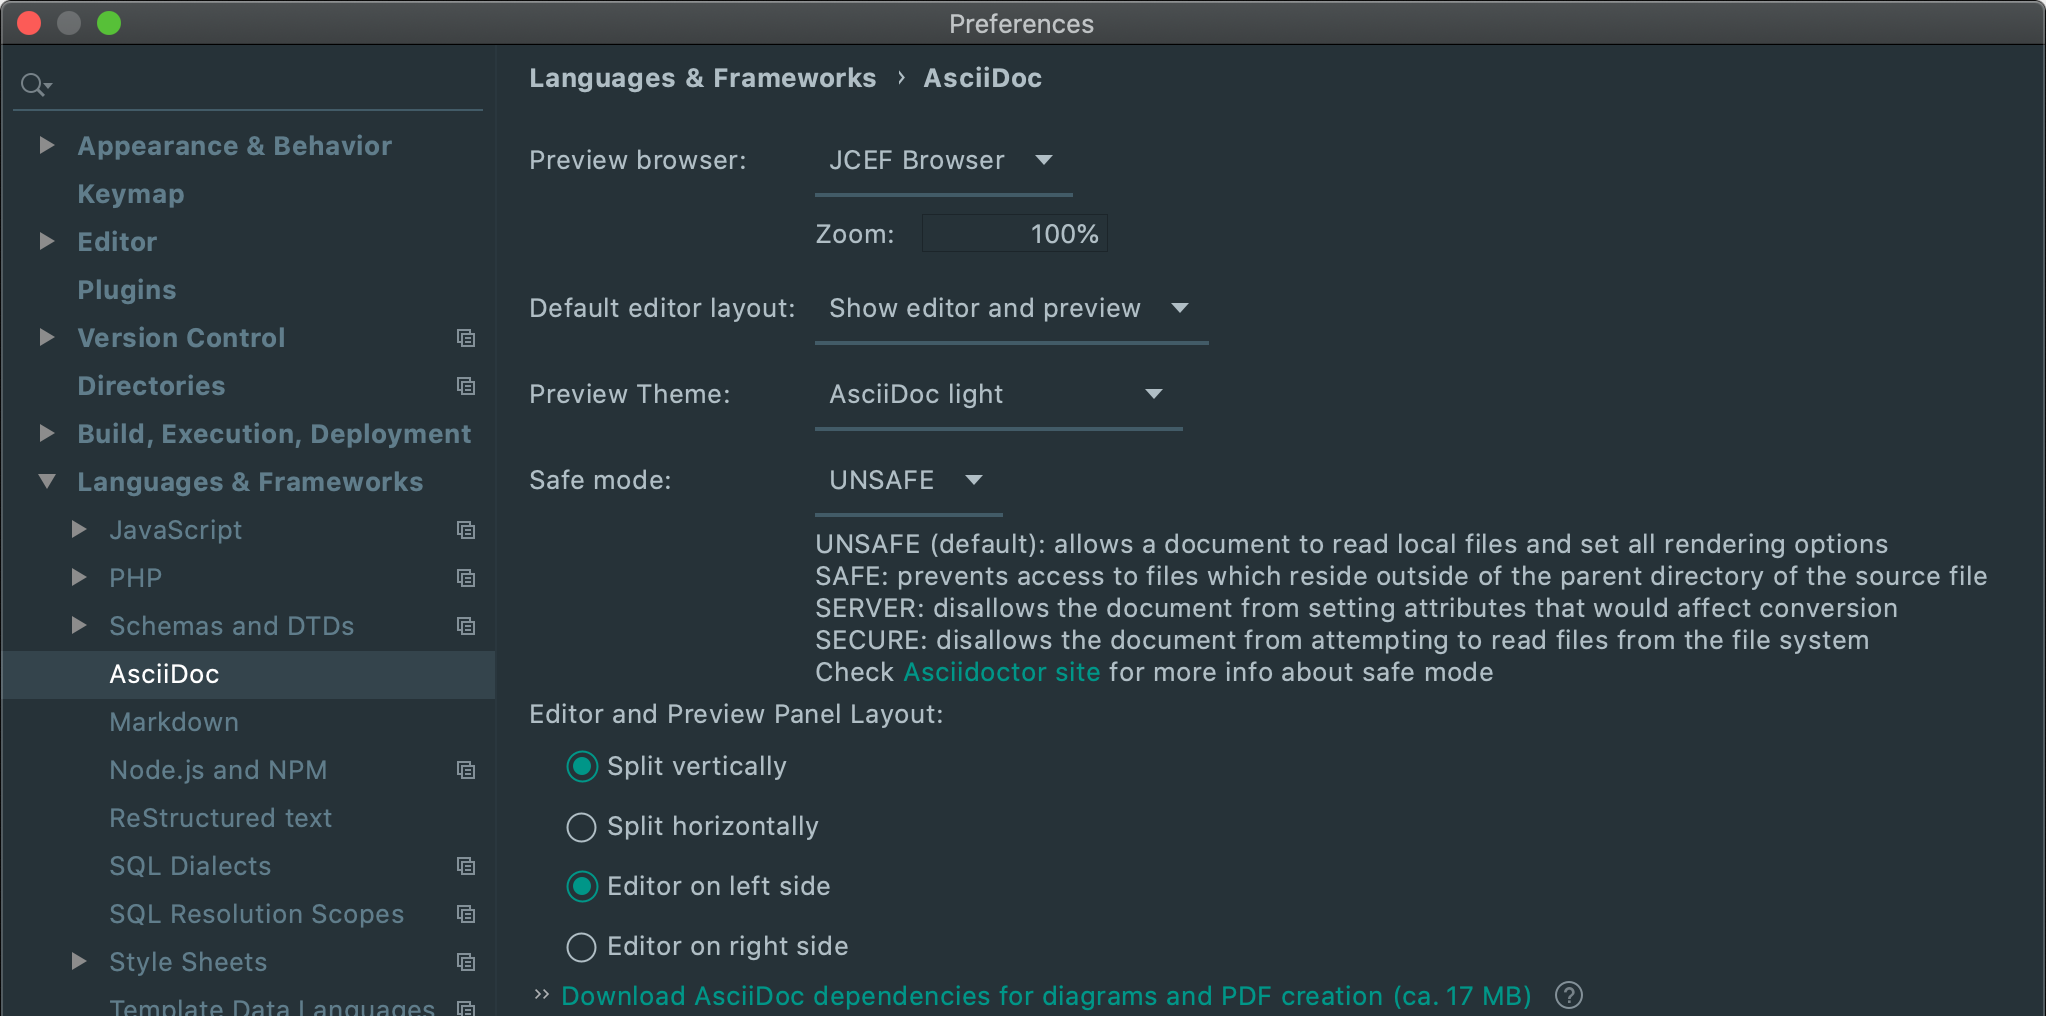
Under Settings | Languages & Frameworks | AsciiDoc, there are two key options that you may want to make use of.
These are:
Enable automatic language injection in source blocks
Enabling this setting enables the full language functionality for any supported language or file format in your source code blocks.
Disable automatic language for
This disables full language functionality for one or more languages. At this stage, I don't know why you'd do that, as I find this functionality extremely helpful. But, you may well have a reason to do so.
There are two other options, "Hide errors for" and "Hide errors in source code blocks for all languages", which I'm assuming, as their names imply, will disable the display of errors for all or multiple languages. However, after a lot of experimentation, I've not seen any effect of using these settings.
Excellent Preview Support
I mentioned this near the top of the post, so it's time to cover it in more detail. By default, when you open an AsciiDoc file, it will open in two panes. The left-hand side one will contain the AsciiDoc source. The right-hand side one will contain an HTML preview.
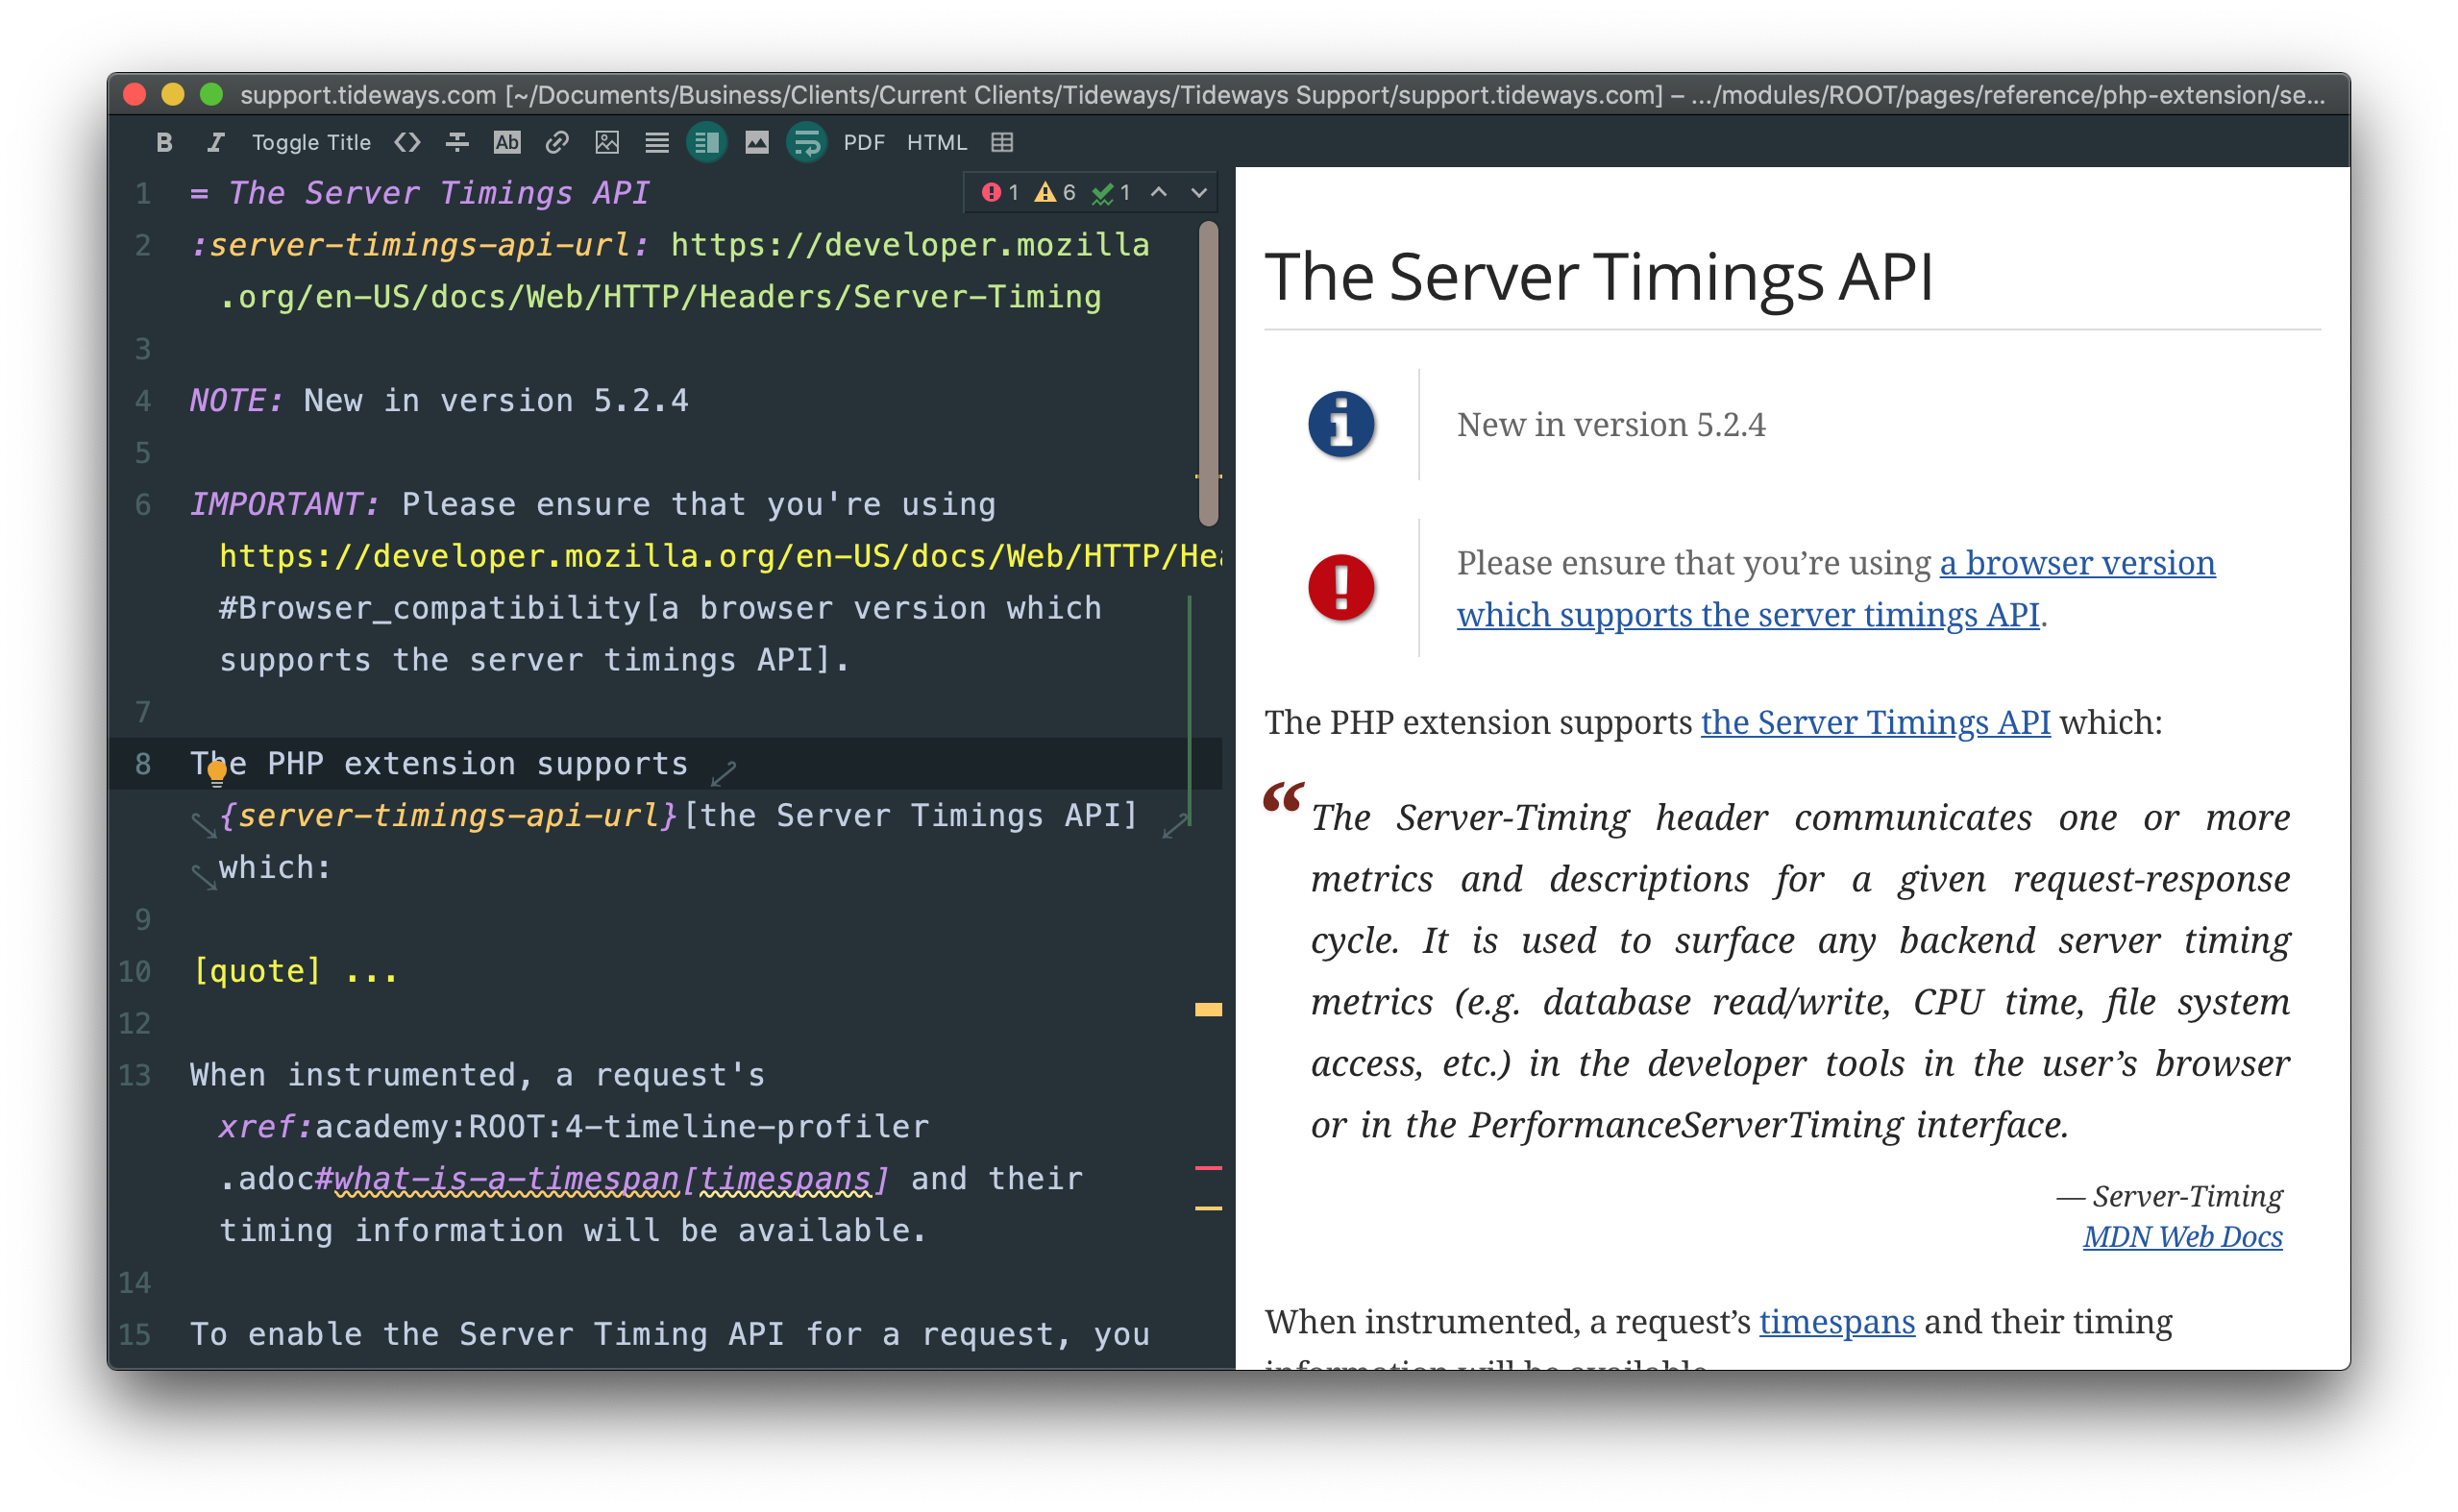
There are two preview themes available: AsciiDoc Light and AsciiDoc dark. I don't mind AsciiDoc dark, but much prefer AsciiDoc Light, as that's the one which I'm used to, and find that it's far more reflective of generated documentation, not to mention it's easier to read.
In addition to the two default themes, you can also add custom stylesheets, if you want the preview to be more like your rendered documentation. I've not done that yet but may experiment with it in the future.
Preview Support Configuration
If you don't like the default configuration, you'll be glad to know that the two-pane setup is configurable. Using the toolbar, you can change between showing just the editor, just the preview pane, or both. However, the change that you make here isn't permanent.
The next AsciiDoc file that you open, and the next time you reopen IntelliJ, the default configuration will be back.
So, to configure the setup permanently, first navigate to Settings | Languages & Frameworks | AsciiDoc.
When there are three settings to be aware of:
- Default editor layout. I have mine set to "Show editor only".
- Preview Theme
- Editor and Preview Panel Layout
Now, there are some other configuration options that you'll want to be aware of as well.
AsciiDoc Attributes
If you need to set AsciiDoc attributes, such as a page-level attribute, to enable a table of contents, or if you're using AsciiDoc's experimental support, this is where you add them.
Enable/Disable Folding
Code folding is a feature that I'm hooked on, and it's especially helpful if you are working with a large file of text. By enabling this option, down the left-hand side gutter of the editor pane, you'll see down and up arrows, surrounding regions of text, from the entire page, to a single paragraph.
If you click either the bottom or top arrow for a region, it will be closed with an ellipsis to indicate that something is there. If you click the ellipsis or the plus icon, the region will be expanded again. What's more, if, while a fold is closed, then you'll see the content in a popup.
Excellent Auto-completion Support
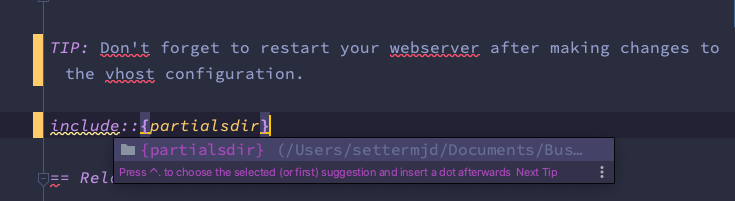
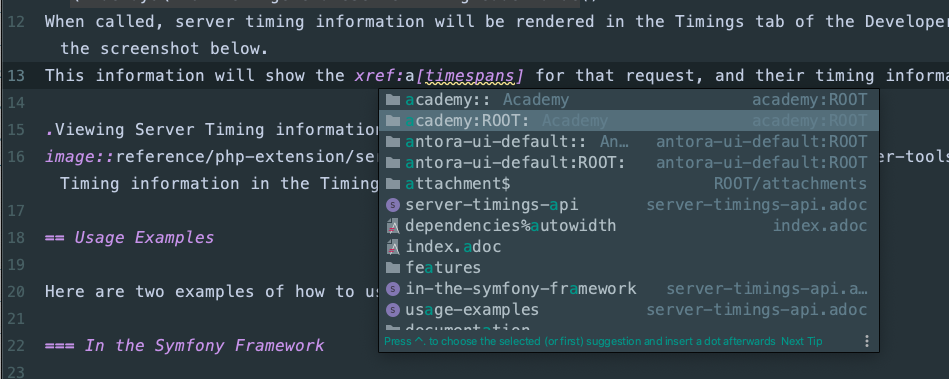
One of the first things that stood out for me is the excellent auto-completion support. Building on IntelliJ's IntelliSense technology, whenever you're including cross references, page attributes, images, partials, and pages, the plugin will start auto-completing the item for you, offering context-specific suggestions, where relevant.
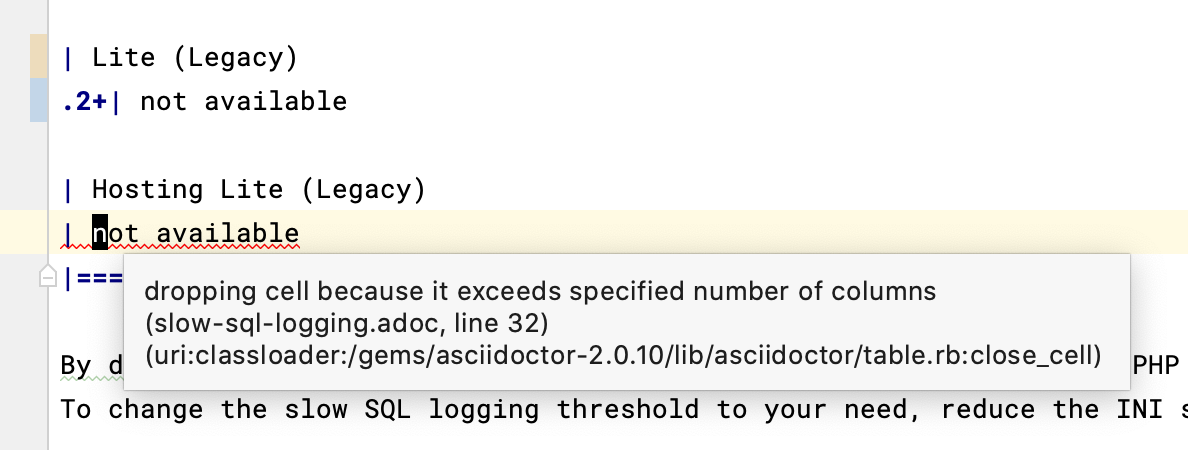
if you have a mistake in a path or file name, you will see the red, squiggly underline. If you mouse-over it, you'll see a description of the error, that the file or path is incorrect.
Great Refactoring Support
This is something that I can't speak enough about, because of how much time it has saved me. Building on (or integrating with) Intellij's refactoring functionality, the plugin lets you rename, move, and safely delete files and directories, and any references to them throughout your project.
Say, for example, I have the following directory structure:
modules
└── ROOT
    ├── attachments
    ├── examples
    │   ├── documentation
    │   ├── guides
    │   └── reference
    ├── images
    │   ├── guides
    │   ├── reference
    │   └── setup
    │   │   └── how-to-install-debian-step-1.png
    ├── nav.adoc
    ├── pages
    │   ├── documentation
    │   ├── features
    │   ├── guides
    │   ├── index.adoc
    │   ├── reference
    │   │   └── how-to-install-debian.adoc
    │   └── setup
    └── partials
        └── setup
If I were to rename or move modules/ROOT/pages/reference/how-to-install-debian.adoc any cross-references to it, throughout every page in any of the content sources, and in the navigation file will be updated.
If I were to move, delete, or rename modules/ROOT/images/setup/how-to-install-debian-step-1.png, any image macro that referenced it, in any page of any of the content sources would be updated.
I can't say enough how grateful I am for this functionality!
Antora Integration
If you're maintaining content for an Antora component or project, then you'll be happy to know that the plugin also has excellent Antora integration.
It can use an Antora project's configuration to transparently set the partialsdir, examplesdir, attachmentsdir, imagesdir, and pagesdir attributes.
What's more, you can also reference cross-references, image, and include macros for other components and modules in the current project.
I've found this functionality absolutely invaluable!
A Minimalist Toolbar

While it's not tool full-featured, a minimalist toolbar is available, for those who are used to using them, and those that prefer to. Okay, they can be quite handy from time to time. It offers functionality for:
- Adding a title
- Creating a PDF or HTML version of the current file
- Creating a table
- Inserting a link
- Pasting an image
- Toggling between editor and preview, preview, or editor only
- Toggling soft-wrapping
- Toggling text as bold, italicised, highlighted, inline source code, or with a strike-through
In addition to the toolbar, if you right-click or context-click on a section (or selection) of text, all of these items are available under the AsciiDoc option at the top of the dialogue that pops up.
You Do Need to Create Your Own Keyboard Shortcuts
Unfortunately, by default, none of these has keymaps assigned to them. To be fair, I've not actually assigned any keymaps to them either.
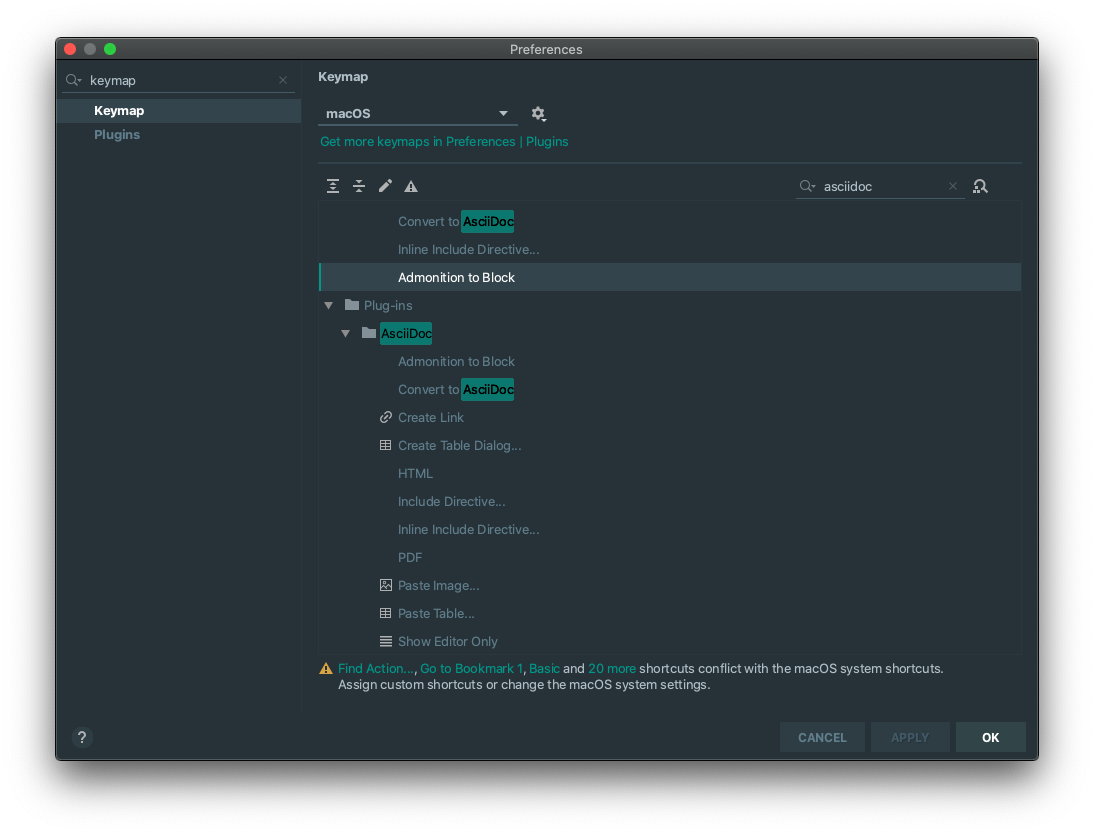
However, if and when you want to, go to Settings | Keymap and then filter with "asciidoc".
When you've done that, right-click and choose "Add Keyboard Shortcut" and then set the shortcut which makes the most sense to you.
Bear in mind that you may have to experiment for a while until you find a combination that both makes sense and doesn't conflict with an existing shortcut combination.
When you've added one or more shortcuts, click Apply + OK, or just OK, and the shortcuts will be saved and ready to use.
It Simplifies Creating Tables
I don't know about you, but I love tables! Yes. That's right.
I. Love. Tables!!!
Well, I love them and use them when they're the right tool for the job. What's more, of all the formatting languages which I've used, AsciiDoc's approach to table formatting is the most accessible, flexible, and accommodating. It's saved me a notable amount of time, in comparison to Markdown or reStructuredText's approach.
That said, anything which helps me save even more time is a welcome addition. So I want to draw attention to how the plugin does that.
As I mentioned earlier, the last item in the toolbar helps create tables. If you click on it, you can then create up to a 10-row x 10 column table by mousing over the grid in the popup, and clicking when the desired number of rows and columns are highlighted.
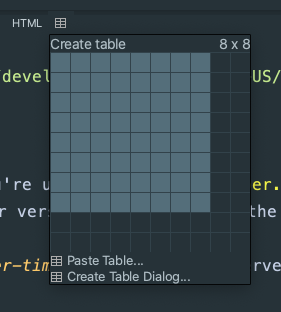
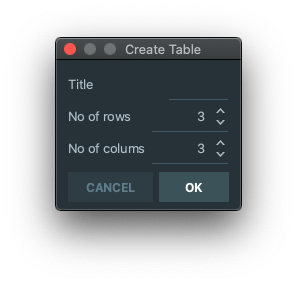
Alternatively, if you need more fine-grained control, click Create Table Dialog... at the bottom of the popup, and you'll be able to create a table with as many rows and columns as you like, and also be able to set a title.
Also, the table will be pre-populated, so that you know which cell is which.
For what it's worth, I like the default formatting, where, in the body of the table, each cell is on a new line. This is the approach that I've been using for months, and find that it's an extremely maintainable way of creating table cell content.
.A small table
|===
|Header 1 |Header 2 |Header 3

|Column 1, row 1
|Column 2, row 1
|Column 3, row 1

|Column 1, row 2
|Column 2, row 2
|Column 3, row 2

|Column 1, row 3
|Column 2, row 3
|Column 3, row 3
|===
It Has Inspections Support
Okay, let's talk about inspections If you're new to Intellij, these might be unfamiliar to you. Here's how JetBrain's documentation describes them:
In IntelliJ IDEA, there is a set of code inspections that detect and correct anomalous code in your project before you compile it. The IDE can find and highlight various problems, locate dead code, find probable bugs, spelling problems, and improve the overall code structure.
Inspections can scan your code in all project files, or only in specific scopes (for example, only in production code, or in modified files).
From an AsciiDoc/Antora-perspective, they help us, quickly, find mistakes that we've made, such as unknown page/site attributes and paths in image, include, and cross reference macros.
The plugin, currently, offers 10, which you can find under Settings | Editor | Inspections | AsciiDoc.
These are:
Anchor ID inspection
Ensures that when anchors reference sections, the sections should have an explicit ID to prevent broken anchors when the heading changes.
Attribute continuation inspection
Ensures that multi-line attribute definitions use backslashes (), instead of a plus sign (+), which is considered legacy style.
Description exists inspection for Antora page
Detects a missing description for an Antora page.
Description length inspection
Detects descriptions that are longer than 155 characters.
Heading inspection
Ensures that AsciiDoc headings start with an equals sign (=).
Horizontal rule inspection
Ensures that an AsciiDoc horizontal rule is made up of three or more simple quotes (').
Link Resolve inspection
Ensures that links resolve.
Listing inspection
Ensures that AsciiDoc listing blocks start with the square brackets and contain the source block type.
Pagebreak inspection
Ensures that an AsciiDoc page break has a maximum of three-page breaks, as having more than three bloats the page.
Reference Anchor and Block ID pattern inspection
Ensures that Block IDs and references need to follow the AsciiDoc pattern conventions.
It Has Intentions Support
Now, let's talk about intentions. If you're new to Intellij, these might be unfamiliar to you. Here's how JetBrain's documentation describes them:
As you work in the editor, IntelliJ IDEA analyzes your code, searches for ways to optimize it, and detects potential and actual problems.
Another way of looking at them is that they're small, context-specific, helpful workflow automations, that save you a lot of time and effort.
The plugin currently offers 5, which you can find under Settings | Editor | Intentions | AsciiDoc:
Add Block ID to section
This intention adds the ID of the section explicitly as a block ID. This is helpful when you want to use a consistent anchor id, one that won't change automatically as the related text changes.
Extract Include Directive
This intention encourages you to follow a best practice of not letting a document grow too large. It can create a new include file from one of the currently selected text, the current block, or the current section.
Hide errors in source blocks for all languages
This intention disables errors highlighting in AsciiDoc source blocks.
Inline Include Directive
This intention is the inverse of the Extract Include Directive.
Refactor to block admonition
his intention refactors an inline admonition to a block admonition.
Live Templates
Live templates insert common constructs into your code (or documentation), such as loops, conditions, various declarations, or print statements.
he plugin comes with a significant number of them, specifically for AsciiDoc, such as adding footnotes, bibliographies, includes, attributes, lists, checklists, sidebars, and titles.
If you're not familiar with them, they work by expanding a code snippet when the tab key is pressed.
For example, say that you wanted to insert add a Ruby source code block, then you would type ad-source:ruby and press tab.
The following source code block will then be inserted:
[source,ruby]
.filename.rb
----

----
In addition to inserting the block, they offer post-insertion automation to help you complete the template. In the animation below, you can see that after the Ruby source code block is inserted, the caret is then taken to the block's title text, where you can insert the file's name.
Note that, as you're typing the text, auto-completion will kick in, and give you a list of suggestions which are similar to what you're typing.
In Summary
Here’s my honest opinion — this plugin is excellent!
It has saved me so much time so far, and there is still so much of its functionality which I’m not fully using yet. It’s well thought out. It’s well written.
What’s more, it integrates beautifully with the various IntelliJ IDEs. So, if you’re already familiar with one or more of the JetBrains IDEs, then the plugin will be natural and intuitive.
I don’t have specific feature requests, as I’ve yet to hit the limits of what I can do with the plugin. So, my recommendation to you is, if you’re an IntelliJ user, use this plugin.
If you’re not yet an IntelliJ user and are looking for an extremely capable AsciiDoc editor, then download IntelliJ IDEA Community Edition, install the plugin, and try it out!
There’s far more functionality which you can get out of using one of the JetBrains IDEs in tandem with the AsciiDoc plugin, but in this review, I’ve tried to stick close to the plugin. If you’re interested in said related functionality, however, let me know in the comments.
There’s a lot on offer, such as distraction-free mode, navigation support, and git integration.