 Are you tired of hearing how "simple" it is to deploy apps with Docker Compose, because your experience is more one of frustration? Have you read countless blog posts and forum threads that promised to teach you how to deploy apps with Docker Compose, only for one or more essential steps to be missing, outdated, or broken?
If you're not familiar with Docker, to quote Wikipedia:
Docker is an open-source project that automates the deployment of Linux applications inside software containers.
Here's a longer description:
Docker containers wrap up a piece of software in a complete filesystem that contains everything it needs to run: code, runtime, system tools, system libraries — anything you can install on a server. This guarantees that it will always execute the same, regardless of the environment it is running in.
Now, you might be thinking that this all sounds similar to tooling you've used in the past, such as a LAMP stack or a Vagrant/VirtualBox VM. And in a way it is.
But Docker's a lot less resource and time intensive. As the quotes above summarize, Docker contains — and uses — only what it needs to run your application.
You're not building a big virtual machine which will consume a good chunk of your development machine's resources. You don't have to learn — and write — massive configuration setups to build a basic, working, setup. You don't need to do much at all to get your up and running.
Docker allows you to build your application's infrastructure, as you would your code. You determine the parts and services you need and stack them together like LEGO blocks.
If you need to change your web server or database server, then switch the current one out for another. Need to add a caching, logging, or queueing server? Add it into the mix and keep on going.
Prerequisites
Before we go any further, to follow along with this tutorial, you'll need the following:
- Composer, installed globally
- Docker Engine
- Docker Compose
- Git
- Your preferred editor or IDE (mine's PhpStorm)
- Your preferred browser (mine's Firefox)
- Some prior experience with Docker and Git
- Knowledge of terms such as image and container
How do you dockerise a PHP application?
Depending on your application's needs, there isn't a lot to do. And, in the case of the demo application that I'll use for this tutorial, it will be done, primarily, in one file: compose.yml. This is Docker Compose's default configuration file.
In there, we're going to provide the settings for three containers:
- One for PHP
- One for NGINX
- One for MySQL
As you'll see, we'll specify:
- The image which each container will be based on
- Port and volume mappings between the local development environment and the container
- Environment variables to pass to the container
So, by using Docker Compose, when we're finished, we only need to run one command to start (or locally deploy) the application.
The Docker setup
Typical PHP applications, at their most basic, are composed of three parts:
- A web server (commonly NGINX or Apache)
- A PHP runtime (such as PHP-FPM)
- A database server (usually MySQL, PostgreSQL, or SQLite)
This can be visualized in the illustration below.
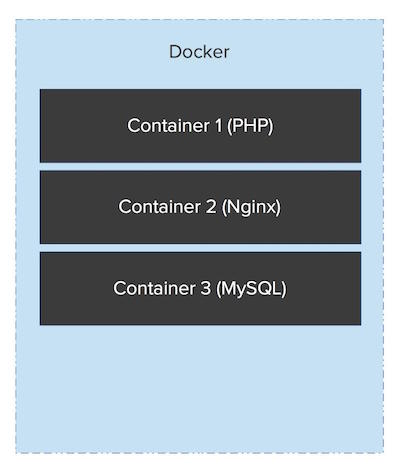
Sure, there are a host of other components that you could include, such as caching and logging servers. But, I'm sticking to the bare basics in this tutorial.
Our setup's going to mirror that, as I mentioned before, having a container for each component which we've listed above.
Clone the demo application
Before we dive into the configuration, clone the demo application locally, change into the top-level of the cloned directory, and install PHP's dependencies, by running the following commands.
# Clone the repo
git clone git@github.com:settermjd/deploy-with-docker-compose-demo-app.git
cd deploy-with-docker-compose-demo-app

# Checkout the correct branch
git checkout -b default 1.0.0

# Install PHP's dependencies
composer install \
  --no-ansi \
  --no-plugins \
  --no-progress \
  --no-scripts \
  --classmap-authoritative \
  --no-interaction

# Enable the application's development mode
composer development-enable
Note: if you're a Windows user, replace the backslash (\) with a caret (^) in the above command.
If you get prompted with the following question, answer y.
Do you trust "laminas/laminas-component-installer" to execute code and wish to enable it now? (writes "allow-plugins" to composer.json) [y,n,d,?]
If you get prompted with the following questions, answer with 1 and Y.
Please select which config file you wish to inject 'Mezzio\Tooling\ConfigProvider' into:
[0] Do not inject
[1] config/config.php
Make your selection (default is 1):

Remember this option for other packages of the same type? (Y/n)
{{< partial "inline-book-promotion-docker-compose" >}}
The web server container
In the root directory of your project, create a new file named compose.yml add the following to it.
services:
  nginx:
    image: nginx:1.25.3-alpine
    ports:
      - 8080:80
    volumes:
      - ./docker/nginx/default.conf:/etc/nginx/conf.d/default.conf
      - .:/var/www/html
It starts off by defining an element called services.
This element lists the definitions of the three containers which will make up our build.
The services section starts off with the NGINX container.
This creates a container called nginx, which can be referred to by the other containers using the hostname nginx.
It will use the official Docker Hub NGINX image as the base for the container.
After that, we map port 80 in the container to port 8080 on our host machine.
This way, when we're finished, we'll be able to access our application by navigating to http://localhost:8080.
Next, using the volume attribute, it mounts ./docker/nginx/default.conf on the local filesystem to /etc/nginx/conf.d/default.conf in the container; this file provides NGINX's core configuration.
To save space, I've not included it here. However, create a new directory named docker/nginx. Then, download it to that new directory, naming it default.conf.
This has the effect of sharing the project directory with the container, rather like Vagrant's shared folders. This let's us develop locally, on our development machine, while automatically syncing the code to the NGINX server.
When we make changes, they'll almost instantly be synced to the running application. There is no need to manually copy or sync files between your development environment and the container.
Finally, the application's source and supporting files are mounted into the container.
The PHP container
The configuration for the PHP container is rather similar to that of the NGINX container.
Copy the following configuration after the nginx configuration in compose.yml.
  php:
    build:
      dockerfile: docker/php/Dockerfile
    volumes:
      - .:/var/www/html
You can see that it starts off by naming the container php, which sets the container's hostname to php.
However, it doesn't contain the image attribute.
Rather, it uses the build attribute.
This tells it to use a configuration file, named Dockerfile located in ./docker/php, to build a custom image upon which the container will be based.
So, first, create the required directory structure with the following command.
mkdir -p docker/php
Then, create a new file named Dockerfile in that new directory. Then, add the following to it.
FROM php:8.2-fpm

RUN docker-php-ext-install pdo_mysql
This configuration builds a custom image based on the official Docker Hub PHP image, which uses PHP 8.2.
Then, docker-php-ext-install (a script available with the official image) is used to install PHP's pdo_mysql extension.
Note: The command does not install an extension's dependencies. If the dependencies aren't available, the command will fail.
Going back to compose.yml, lastly, we're mounting the local (project) directory on our development machine at /var/www/html in the container.
The database container
Now, for the final piece, the database container.
Copy the following configuration after the php configuration in compose.yml.
  database:
    build:
      dockerfile: docker/database/Dockerfile
    ports:
      - "3306:3306"
    environment:
      MARIADB_ROOT_PASSWORD: password
      MARIADB_DATABASE: hawaii-five-0
      MARIADB_USER: user
      MARIADB_PASSWORD: password
    volumes:
      - database_data:/var/lib/mysql

volumes:
  database_data:
    driver: local
As with the other containers, we've given it a name (and hostname), mysql, and maps port 3306 on the local development machine to the same port in the container.
This lets us use database clients, such as the database tool in PhpStorm or the MySQL command line client, to interact with the database during development.
Then, it sets four environment variables. These are for the root MariaDB password, the name of the database to create, and a username and password for interacting with the app's database.
Lastly, using the volumes attribute, we're making any changes in /var/lib/mysql, where MySQL stores its data files, permanent.
This is a little different to how the NGINX and PHP containers were configured.
It ties in with the persistable filesystem volume which is defined at the end of the above configuration.
This is important as, by default, filesystems in a Docker container are don't persist any changes made during runtime. What this means is that when a container restarts the original files will be restored and any new files will be removed. Not a great thing when working with databases, or other storage mechanisms.
Now, create a new directory, docker/database, and in that directory, create a file named Dockerfile. In the file, add the following contents.
FROM mariadb:11.1.2-jammy

COPY ./docker/database/dump.sql /docker-entrypoint-initdb.d/dump.sql
The configuration uses the official Docker Hub MariaDB image as its foundation. Then, it copies a SQL file, dump.sql into the image. By doing this, when the container starts up, it will run the queries in that file and provision the database.
Download the database dump file into docker/database, saving it as dump.sql.
Deploy the application locally
Now that we've created all of the required configuration files, let's deploy the application locally. From the terminal, in the top-level directory of your project, run the following command:
docker compose up -d
The command looks for compose.yml in the current directory, for the instructions it needs to build the containers, builds them, then starts them in the background and leaves them running.
In the terminal output, you'll see each container being created and started. The first time that you run the command, the three base images will be downloaded; so please be a little patient. However, after the first time, they'll usually be booted in under a minute.
Regardless, you should see output in the terminal similar to the following.
[+] Building 1.3s (13/13) FINISHED                                                                                                                                  docker:default
 => [database internal] load build definition from Dockerfile                                                                                                                 0.0s
 => => transferring dockerfile: 133B                                                                                                                                          0.0s
 => [database internal] load metadata for docker.io/library/mariadb:11.1.2-jammy                                                                                              1.1s
 => [php internal] load build definition from Dockerfile                                                                                                                      0.0s
 => => transferring dockerfile: 93B                                                                                                                                           0.0s
 => [php internal] load metadata for docker.io/library/php:8.2-fpm                                                                                                            1.1s
 => [database internal] load .dockerignore                                                                                                                                    0.0s
 => => transferring context: 199B                                                                                                                                             0.0s
 => [php internal] load .dockerignore                                                                                                                                         0.0s
 => => transferring context: 199B                                                                                                                                             0.0s
 => [database internal] load build context                                                                                                                                    0.0s
 => => transferring context: 219B                                                                                                                                             0.0s
 => [database 1/2] FROM docker.io/library/mariadb:11.1.2-jammy@sha256:2403cc521634162f743b5179ff5b35520daf72df5d9e7e397192af685d9148fd                                        0.0s
 => => resolve docker.io/library/mariadb:11.1.2-jammy@sha256:2403cc521634162f743b5179ff5b35520daf72df5d9e7e397192af685d9148fd                                                 0.0s
 => [php 1/2] FROM docker.io/library/php:8.2-fpm@sha256:2aa938b6d62f7415e9c84d867d9ceed18ef8ec3cf3944d389e088c93f9678a84                                                      0.0s
 => => resolve docker.io/library/php:8.2-fpm@sha256:2aa938b6d62f7415e9c84d867d9ceed18ef8ec3cf3944d389e088c93f9678a84                                                          0.0s
 => CACHED [database 2/2] COPY ./docker/database/dump.sql /docker-entrypoint-initdb.d/dump.sql                                                                                0.0s
 => [database] exporting to image                                                                                                                                             0.1s
 => => exporting layers                                                                                                                                                       0.0s
 => => exporting manifest sha256:c80d71b74b9527cfef240ef2af603ae2f7664a39d71a1eccc7ba999770e7268f                                                                             0.0s
 => => exporting config sha256:90635537c947299c56e7e7824d8e560a27fed63920f2ed24a51d0aeca74bb6d7                                                                               0.0s
 => => exporting attestation manifest sha256:55599994b765b266af83227424fccdab1eea1585d9ecea0da296dd613ed955c5                                                                 0.0s
 => => exporting manifest list sha256:4113734cf75a7de3a763af833906a688dd6ce8d6c7b98856471048eb51f519a9                                                                        0.0s
 => => naming to docker.io/library/deploy-with-docker-compose-talk-app-v2-database:latest                                                                                     0.0s
 => => unpacking to docker.io/library/deploy-with-docker-compose-talk-app-v2-database:latest                                                                                  0.0s
 => CACHED [php 2/2] RUN docker-php-ext-install pdo_mysql                                                                                                                     0.0s
 => [php] exporting to image                                                                                                                                                  0.1s
 => => exporting layers                                                                                                                                                       0.0s
 => => exporting manifest sha256:5e7d92bb359784ef8ad90088fec44eda695cfb8801ce98f5a15035328285bed1                                                                             0.0s
 => => exporting config sha256:09378e3ec485ff61a4b1bb5c94472535945ca31f19f14f3dada3a76a08ba562c                                                                               0.0s
 => => exporting attestation manifest sha256:39190fdbfd72f295b4b735b5170e6fead7e0ce58621b29a2555d9c8065ab6187                                                                 0.0s
 => => exporting manifest list sha256:5ae9fbfb34c83435b05bc6fc2b11e0ab33edbedafdaca12c425d4f0fc5122817                                                                        0.0s
 => => naming to docker.io/library/deploy-with-docker-compose-talk-app-v2-php:latest                                                                                          0.0s
 => => unpacking to docker.io/library/deploy-with-docker-compose-talk-app-v2-php:latest                                                                                       0.0s
[+] Running 5/5
 ✔ Network deploy-with-docker-compose-talk-app-v2_default         Created                                                                                                     0.0s
 ✔ Volume "deploy-with-docker-compose-talk-app-v2_database_data"  Created                                                                                                     0.0s
 ✔ Container deploy-with-docker-compose-talk-app-v2-nginx-1       Started                                                                                                     0.1s
 ✔ Container deploy-with-docker-compose-talk-app-v2-php-1         Started                                                                                                     0.1s
 ✔ Container deploy-with-docker-compose-talk-app-v2-database-1    Started
At the start of the output, you can see the containers being built. At the end of the output, you can see the containers being created and started.
Test that the application works
Now, you're ready to use them.
So open http://localhost:8080 in your browser of choice to confirm that it's working.
The page should look similar to the following screenshot.

After that, shut down the deployment by running the following command.
docker compose down
That's how to dockerize a PHP application
I hope that you see that there's less to do than you might have expected, yet we've still achieved quite a lot. We have one container which runs PHP, one which runs NGINX, and one which runs MySQL; all able to talk to each other as needed. You could say that we can now build environments a lot like we build code — in a modular fashion.
I appreciate this has been quite a rapid run-through of what you need to know. But, it has covered enough to get you started.
{{< in-this-series series="Developing with Docker" >}}