 Are you tired of hearing how "simple" it is to deploy apps with Docker Compose, because your experience is more one of frustration? Have you read countless blog posts and forum threads that promised to teach you how to deploy apps with Docker Compose, only for one or more essential steps to be missing, outdated, or broken?
At first glance, this might not seem like much of a problem. However, at least when I was first getting up to speed with Docker, I didn't know how?
If I was using a Vagrant-based virtual machine, for example, then I’d run vagrant ssh to SSH into the virtual machine.
Then I'd run the tests as I normally would, and see if any tests were red.
Alternatively, I would execute the tests remotely in the virtual machine, instead of ssh’ing in first.
After a bit of searching, I found that it’s not that difficult. You just have to use the correct Docker or Docker Compose command.
Prerequisites
To follow along with this tutorial, make sure you have the following:
- Docker Engine
- Docker Compose
- Git
- Composer, installed globally
- A local copy of the series demo application. Make sure you check out the 2.0.0 tag.
- Your preferred text editor or IDE (mine is PhpStorm)
Start the demo application
First, deploy the application locally by running the following command.
docker compose up -d
If you open http://localhost:8080 in your browser of choice, it should look similar to the following screenshot.

It doesn't do a lot, just indulge my love of the 2010 - 2020 reboot of Hawai'i Five-O by showing a list of the main cast members over the course of the series.
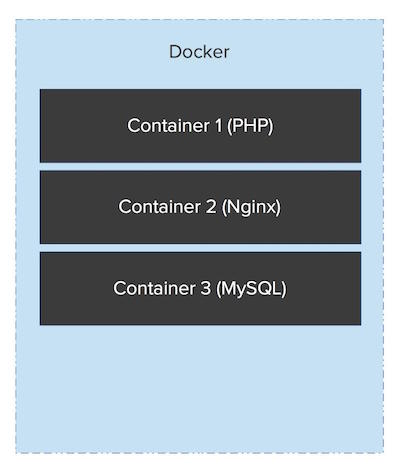
If you've had a look at the Docker Compose configuration in compose.yml, you'd see that the application is quite simplistic. It has three containers (or services):
- One for NGINX to handle requests (either serving up static files, or passing off requests to PHP and passing back its response)
- One for PHP to handle dynamic requests
- One for MariaDB, as the site's content is stored there
This can be visualized in the illustration below.
Option number one - docker compose run
At first, I thought that I'd use docker compose run.
This will boot up a new instance of the PHP container, on a separate network, without any container which might be needed to perform the tests, such as one providing a database or cache server. Given that, it's likely that the tests would fail.
Instead, you need to use docker exec. This command connects to an existing, running, container. So, it will be in the same network with the other containers which it would need. As a result it will be able to access them and execute the tests successfully (assuming they all should pass).
Option number two - docker compose exec
If you look in the application's source, you'll see that the test suite is powered by PHPUnit.
What's more, you'll see that composer.json defines the Composer script test to simplify running the PHPUnit test suite.
So, run the test suite, you only need to run the following command:
docker compose exec php php /usr/bin/composer test
It's not that different from running tests in either a virtual machine, or locally.
Using exec Docker will execute the command php composer test in the container named php.
It's quite similar to running a command on a remote server with ssh or vagrant ssh using the -c or --command switches.
What about running an individual test, such as test/AppTest/Handler/HomePageHandlerTest.php, which has covering tests for src/App/src/Handler/HomePageHandler.
To do this, you'd just add the path to the test class at the end of the previous command, as follows:
docker compose exec php composer test test/AppTest/Handler/HomePageHandlerTest.php
Running the tests directly inside the running container takes only a little more effort.
You'd first SSH into the running (php) container, by running the following command.
docker compose exec php /bin/bash
In the command above, change /bin/bash to whatever shell is available in your container, such as ash or zsh.
Then, you run your test suite, whether using one of the earlier approaches, or using a different tool or framework entirely.
For example:
# Run the entire test suite
composer test

# Run just one test
composer test test/AppTest/Handler/HomePageHandlerTest.php
Run tests with a single Docker container
If you'd dockerised your PHP application inside a single Docker container, and had started it with docker run instead, the command is almost exactly the same.
If that was the case, you'd use the command below, instead, after replacing the placeholder (<<Container's Name>>) with the image's name.
docker exec <<Container's Name>> composer test
If you wanted to run the tests within the container, you'd first exec into it, using the command below.
docker exec --interactive --tty <<Container's Name>> /bin/bash
Then, you'd run the Composer test script as before.
And that’s how to run PHP tests when using Docker and Docker Compose
While there are many approaches to doing so, this one at least doesn’t make things overly complicated.
By making only a slight addition to your local Docker development environment, you are now able to run all your tests, regardless of their type, as easily as you would if you were using a Vagrant-based virtual machine, or one of the MAMP, WAMP, or LAMP stacks.
{{< in-this-series series="Developing with Docker" >}}