Over the last number of months the Zend Framework team’s been hard at work on Zend Framework 3. And there are major changes afoot. In this 2-part series, we look at one of the core components - Zend Expressive.
What is Zend Expressive
Zend Expressive is very succinctly described, in the project repository, as:
PSR-7 middleware applications in PHP in a minute!
The key terms there are PSR-7 and middleware. If you’re not familiar with either of those terms, here’s the short versions of both, starting with middleware.
Middleware
Middleware is, in the context of software applications, a layer that sits somewhere in the middle, between a request and response. That’s a terribly broad way of describing it, right? But it’s the best one I have right now. But let’s try and get more specific.
Applications built around a middleware foundation are able to insert functionality in what can be thought of as a series of blocks, blocks which don’t necessarily need to know about one another, nor have any relevance to those which come before, nor those which come after.
The blocks are stacked in a particular order and can either pass the current request on to the next one in the chain, or change the request, based on what happens during the processing of that block, changing the dispatched request.
Let’s say your application, for whatever reason, doesn’t currently require users to authenticate, before providing them with access. How would you implement authentication? You could create an application module, then refactor all the relevant parts of your application to reference it.
Or, if it’s built with middleware in mind, you could build login middleware, then insert it near the start of the call chain, before the request gets to the rest of the application.
If the authentication process is successful, it would let the user continue having access to use the application. If it wasn’t, then it would re-route the request, dispatching it to an authentication failed page.
PSR-7
Now for PSR-7. If you’ve not read the documentation, which is quite lengthy though very detailed, Zend Framework project lead, Matthew Weier O’Phinney, describes it on his blog as:
A set of standard HTTP message interfaces so that we can create an ecosystem in which PHP developers can create re-usable middleware that they can share.
I could go on at length about it, but I’m keen to get to talking about Zend Expressive. So bear with me in that regard. Time allowing, however, I’ll update this section with more detailed information.
What is Zend Expressive?
Here’s a simple paradigm for understanding it. Have you built applications using Slim or Silex, then you’re already familiar with how Zend Expressive works. That definition isn’t quite complete, but it’s a good starting point for thinking about it.
If you’re not familiar with either of these two PHP microframeworks, they build upon the Sinatra framework for Ruby, which allows applications to be built extremely light and efficiently. Routes are defined in the following style:
get '/hi' do
  "Hello World!"
end
In PHP, we’d do something like the following:
$app->get('/hello/:name', function ($name) {
    echo "Hello, $name";
});
What you see is the definition of a route, accessible via a GET request. The functionality of the route is defined in the anonymous function, which just prints “Hello, $name”, interpolating $name from the route URI, as the response body.
This style of application development lies in stark contrast to the approach which you might be familiar with creating, especially with ZF2Skeleton app or Zend Framework 1 applications, where so much is loaded and used upfront.
This type of approach is a lot lighter and easier to create, as you’re only using the components you need, as opposed to a more monolithic or “kitchen-sink” style approach. That’s the first part.
The second part is that you can create middleware to build up the functionality of your application. I’ll go in to more detail about that in part two of this series.
Then there’s the third part, the core components of a Zend Expressive application. Expressive builds heavily upon a number of other Zend Framework 3 components, such as Stratigility and Diactoros.
It also takes advantage of the Zend Framework 2.5 release, which finished up the process of splitting all of the Zend Framework components in to separate projects, having none bound to any other.

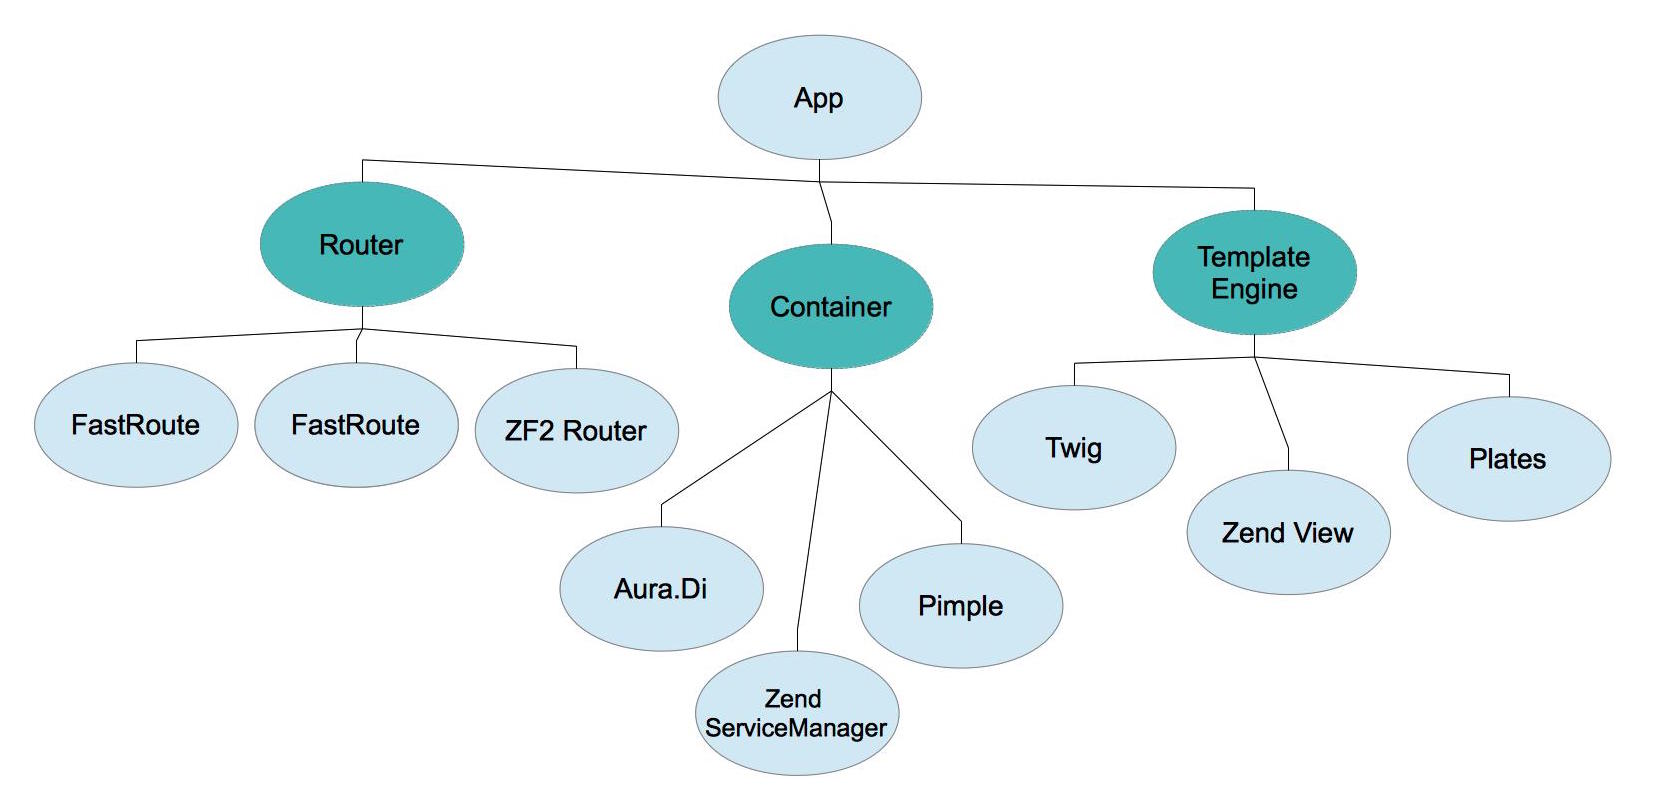
Given that, the project and any applications which you build with it are very flexible and very customizable. Essentially a Zend Expressive application is composed of three core components. These are:
- A Router
- A Container
- A Templating Engine
- An Error Handler
For each of these components, there are three choices available, along with a sensible default, should you not be sure which one to choose. For the router, you have the choice of FastRoute, the ZF2 router and Aura.Route.
For the container, you have the choice of Aura.Di, Pimple, and Zend ServiceManager. For the templating engine, you have the choice of Plates, Twig and Zend View (PhpRenderer).
Finally, if you build a project using the skeleton installer, you’ll also be able to use Whoops, which is:
a nice little library that helps you develop and maintain your projects better, by helping you deal with errors and exceptions in a less painful way.
I’d not heard of it before I started working with Zend Expressive. But it’s a handy library to display exceptions, during development, in a clear and succinct way.
Quick Note About Package Choices
I don’t want to try and sway you toward one choice or another, as your project’s needs, you and your team’s familiarity with the respective packages, amongst other factors will best decide the right choice for you.
However, if you’re unsure, or just starting out, then I strongly suggest that the defaults for each category will be fine, at least until you’re presented with a reason to change.
A Basic Application
Ok, let’s get started installing it.
To do so, assuming that you have Composer installed as a binary on your system, run the following command.
This will create a new project, based off of the Zend Expressive Skeleton project, in a directory called expressive-demo-app.
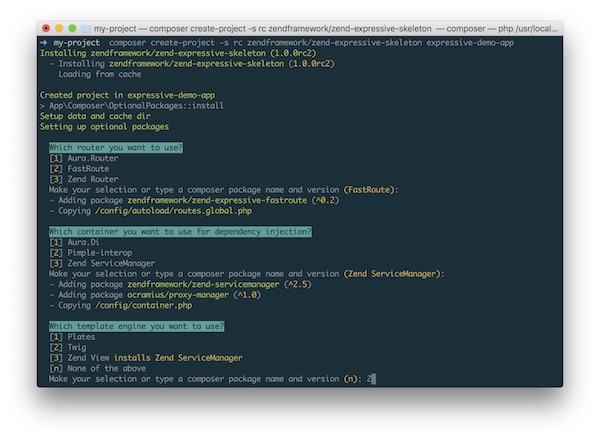
composer create-project -s rc zendframework/zend-expressive-skeleton expressive-demo-app
During the setup process, you’ll be asked which package you’d like for: the router, container, and templating engine.
You can accept the defaults, or pick a preferred option.
I chose to go with:
- FastRoute
- Zend ServiceManager
- Twig
- Whoops

With that done, cd to expressive-demo-app and launch the application using PHP’s in-built web server, by running the command php -S localhost:8000 -t public.
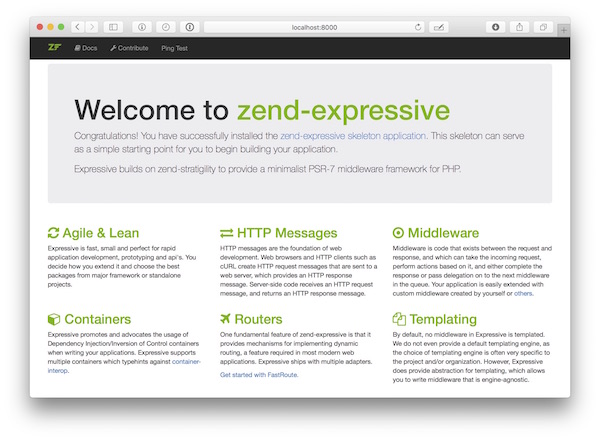
This will launch the web server, running on localhost, listening on port 8000, using the public directory as the document root. Then open your browser to http://localhost:8000, and you’ll see a page which looks like the one in the screenshot below.

It’s quite similar in appearance to the initial application which comes with the ZF2Skeleton project, so don’t be caught out thinking it’s the same thing. One thing worth noting is the documentation under the main banner on the site, i.e., "Agile & Lean" etc.
Depending on the components you chose, the links contained here will change to point to additional information about them. So no matter what you chose, you’ll be able to learn more quite quickly.
The Directory Structure
If you have a look at the directory structure of the application which has been generated, you’ll see a series of directories, along with the usual composer.json, PHPUnit, PHP CodeSniffer, and Travis configuration files.
Here’s a brief breakdown of the directory structure.
| Directory | Description |
|---|---|
| config | contains all of the application configuration files, similar in style to the ZF2Skeleton app project. You can see config files to handle the ServiceManager, template, route, error handling configuration, along with a series of others. |
| data | is a directory for caching, logging, and other non-persistent data |
| public | contains the application bootstrap, and static assets |
| src | contains a PSR-4 compliant source code directory structure. If you look in composer.json you’ll see it’s already been configure under the namespace App. |
| templates | This contains a template for the default route, the 404 and 500 error pages, and the layout template. Depending on your choice of templating engine, the templates will be generated to work with that one. |
| test | A suite of tests has been created to test the existing application’s functionality. |
The application has two routes, the default route / and a ping route /api/ping. Let’s finish up by looking at how the default route works, so that you get an understanding of what’s involved. Starting with config/autoload/dependencies.global.php, you’ll see there the following configuration:
<?php

return [
  'dependencies' => [
    'invokables' => [
      App\Action\PingAction::class => App\Action\PingAction::class,
    ],
    'factories' => [
      App\Action\HomePageAction::class => App\Action\HomePageFactory::class,
      Zend\Expressive\Application::class => Zend\Expressive\Container\ApplicationFactory::class,
    ]
  ]
];
Focusing just on the factories element, what this does is to configure two services, the first is a home page action, and the second is an Expressive application. To quote the documentation directly:
The Application instance is itself middleware that composes:
- a router, for dynamically routing requests to middleware.
- a dependency injection container, for retrieving middleware to dispatch.
- a final handler, for handling error conditions raised by the application.
- an emitter, for emitting the response when application execution is complete.
So what it does is to handle most of the setup process of building an application for you. You can do it on your own, but that’s for the subject of a future post. The HomePageAction service is a service whose instantiation is handled by App\Action\HomePageFactory.
Looking at the definition of that class:
use Interop\Container\ContainerInterface;
use Zend\Expressive\Router\RouterInterface;
use Zend\Expressive\Template\TemplateRendererInterface;

class HomePageFactory
{
    public function __invoke(ContainerInterface $container)
    {
        $router   = $container->get(RouterInterface::class);
        $template = ($container->has(TemplateRendererInterface::class))
            ? $container->get(TemplateRendererInterface::class)
            : null;

        return new HomePageAction($router, $template);
    }
}
You can see that it’s an invokable, which instantiates a new HomePageAction class, with a router and template engine retrieved from the application’s container. What’s excellent about this approach is that it doesn’t matter what container, router, or templating engine you choose.
Within reason, you can swap them out at any time for another which adheres to the required interfaces, and your code doesn’t have to change. Moving on to HomePageAction, I won’t include the code, as it’s too long for the post.
But if you have a look at it, which you’ll find under src/Action, you can see that it’s also an invokable, which just sets some template variables, based on the router and template engine chosen. Focusing on this small snippet below for a moment:
if ($this->template instanceof Template\PlatesRenderer) {
    $data['templateName'] = 'Plates';
    $data['templateDocs'] = 'http://platesphp.com/';
} elseif ($this->template instanceof Template\TwigRenderer) {
    $data['templateName'] = 'Twig';
    $data['templateDocs'] = 'http://twig.sensiolabs.org/documentation';
} elseif ($this->template instanceof Template\ZendViewRenderer) {
    $data['templateName'] = 'Zend View';
    $data['templateDocs'] = 'http://framework.zend.com/manual/current/en/modules/zend.view.quick-start.html';
}
Depending on the templating engine in use, it sets two template variables, templateName and templateDocs, to link to further information about it.
When that’s done, a new HtmlResponse object is returned, which is passed a call to the template engine’s render method. This call takes two parameters, the template, and the template data.
If the template name seems a bit strange at first, I hope it won’t for long, as I think it’s a great way of being able to quickly and simply segregate templates.
Here’s how it works the part prior to the two semi-colons is the directory which the template is stored in, and the second part is the name of the template, prior to the template file’s suffix, which is .html.twig for Twig templates.
If you look in templates/app/home-page.html.twig, you can see that it makes good use of Twig’s available functionality, including inheritable template blocks and so on.
Over to You
And that’s it for part one in this series. In the next part, we’re going to see how to add database and cache support, using Zend\Db and Zend\Cache.
Are you already using Zend-Expressive for your projects? What’s your experience with it? Share your thoughts in the comments and let’s have a hearty conversation about it.
Where to Find More Information
This has been a rapid introduction to Zend-Expressive and one which could go on at some length. My intent in this series is to give you a good introduction, as opposed to a deep dive analysis.
